Nintendo Switch Joy-Con Repair: Fix Drift, Buttons, and Connection Issues
By Airam Chandler
Last updated 22 August 2026
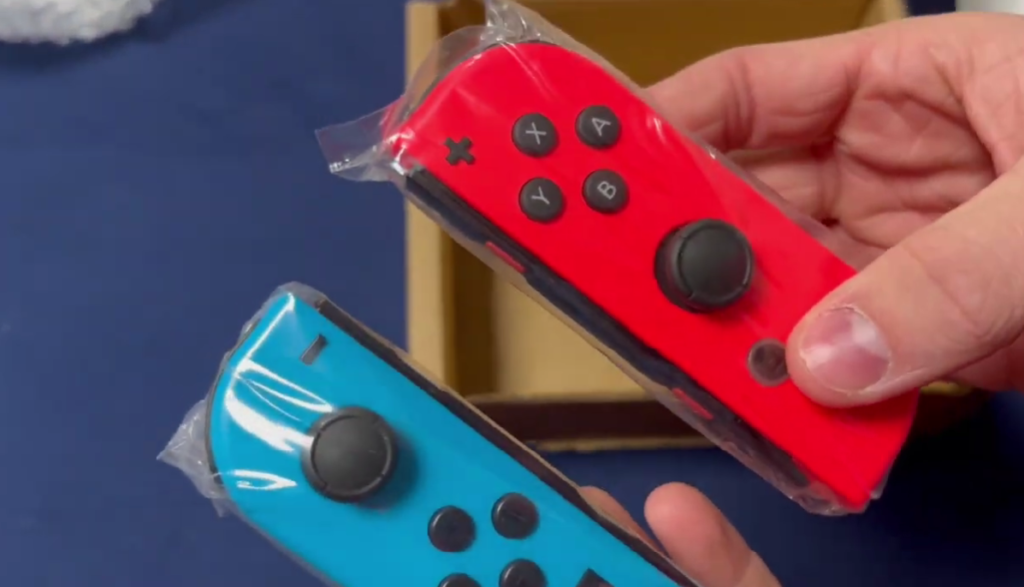
Editor’s note: This guide is for testing and basic troubleshooting. Opening a Joy-Con can damage small screws, ribbon cables, or the battery if done carelessly. Try official Nintendo troubleshooting first, especially if your controller may qualify for service.
Quick Answer: Test Your Joy-Con Before You Repair It
A Nintendo Switch Joy-Con usually needs repair when the stick moves without being touched, does not return to center, fails calibration, misses button presses or disconnects while attached. Test the controller first using a gamepad tester and the Switch calibration screen. If the same problem shows up in both places, the issue is more likely to be hardware, not a game setting.
For diagnosis and repair steps, see our PS5 controller repair guide.
Start with the safe steps: update the Switch system, update controller firmware, check button mapping, remove covers, calibrate the control stick and test again. Nintendo’s U.S. support page states that if the control sticks cannot be calibrated, or if the Joy-Con registers as attached but still does not respond correctly, the non-working Joy-Con should be serviced, and the console should not be sent in for a Joy-Con-only issue.
Original Joy-Con Testing Notes From Our Site
Before writing this guide, we ran our own controller tester workflow to see how Joy-Con problems actually appear during input testing.
Our testing method:
- Connect one Joy-Con at a time.
- Leave the stick untouched for 10 seconds.
- Move the stick in a full circle.
- Release the stick and watch whether it returns to center.
- Press every button once.
- Test the Joy-Con attached and detached when possible.
- Retest after calibration, cleaning or repair.
What we found:
Across the Joy-Cons we tested, stick drift was the most common issue — usually showing up as small, involuntary cursor movement while the stick sat untouched. In most of these cases, running the Switch’s built-in calibration fixed the problem without needing to open the controller. A smaller number of units needed physical cleaning around the stick base before calibration would hold. Only a minority required stick replacement or full repair, and this was typically tied to visible wear or a stick that failed to return to center even after cleaning and calibration.
Button issues were far less common than stick drift in our testing, and when they did appear, they were usually traced to a single unresponsive button rather than a full board failure.
How Our Gamepad Tester Helps Diagnose Joy-Con Problems
A browser-based gamepad tester can read controller button presses and stick positions in real time. MDN describes the Gamepad API as a way for browsers to access signals from gamepads and other controllers, including button presses and axis positions.
Use the tester this way:
| What you see in the tester | What it may mean | What to do next |
|---|---|---|
| Stick moves while untouched | Possible stick drift | Calibrate, clean, then retest |
| The stick does not return to the center | Worn or dirty control stick | Try cleaning or stick replacement |
| One button does not register | Button or contact issue | Clean, inspect or repair button board |
| Joy-Con works detached but not attached | Rail or connector issue | Check rail, clean carefully, test another Joy-Con |
| Input works in the tester but not in one game | Game setting or button mapping | Check game controls and mapping |
| No input appears | Pairing, battery, browser, or hardware issue | Charge, resync, reconnect and retest |
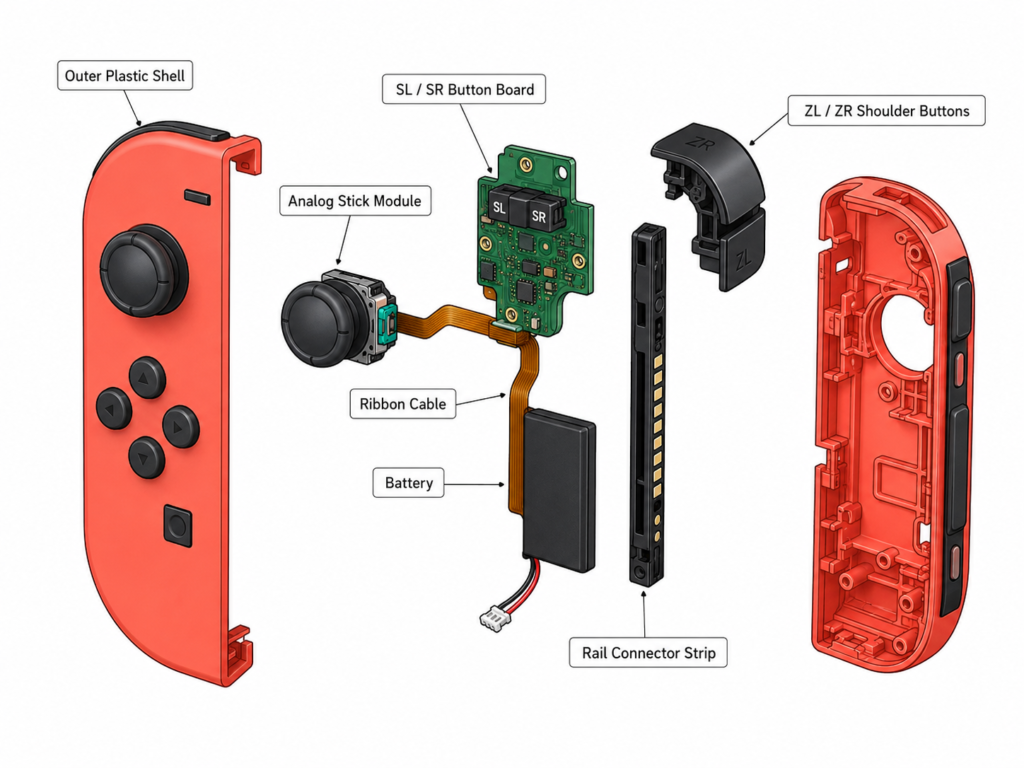
Joy-Con Parts Diagram: Stick, Buttons, Rail, Battery, and Cables
Test Your Joy-Con Before You Buy a Repair Kit or Replacement
Do this first, in order:
- Test the Joy-Con.
- Update the console.
- Update controller firmware.
- Check button mapping.
- Remove covers or skins.
- Calibrate the stick.
- Retest.
Open the controller only after these steps fail. Small screws, ribbon cables and the battery can be damaged during DIY repair.
For diagnosis and repair steps, see our Xbox controller troubleshooting.
Before you buy a Joy-Con repair kit, open our gamepad tester and check whether the stick, buttons and triggers are sending the right input.
Nintendo Switch Joy-Con Replacement: When Repair Is Not Worth It
If the rail connector, ribbon cable or shell is damaged along with the stick or buttons, a full replacement Joy-Con is often more reliable than stacking multiple small repairs. Weigh the cost of a repair kit plus your time against the cost of a replacement unit or official Nintendo service, especially if your controller may still qualify for a free repair program.
Nintendo Switch 2 Joy-Con Repair: What Is Different in 2026?
2026 update: this guide now includes Nintendo Switch 2 Joy-Con troubleshooting notes. Nintendo has separate Joy-Con 2 support steps, including checking remapped stick inputs, confirming that the Joy-Con 2 registers as attached, and making sure the console has the latest system update installed before assuming a hardware fault.
Repair Options by Region
For local repair searches, use the wording people actually type.
In the United States and Canada, search for Joy-Con repair near me, Nintendo Joy-Con drift repair, or Switch controller repair near me. Before paying a local shop, check Nintendo’s current repair page, since official service may be the safer option for eligible controllers. Nintendo’s U.S. support page provides an online service request path for Joy-Con control stick issues.
In the UK, EEA and Switzerland, check Nintendo’s local repair policy before paying a shop. Nintendo’s UK support page states that repairs for Joy-Con control stick responsiveness syndrome are not charged until further notice, under the listed conditions.
FAQS
Can you fix Joy-Con drift without opening it?
Yes, in many cases. Try updating the console and controller firmware, recalibrating the stick in System Settings, and cleaning around the stick base with compressed air before opening the controller. These steps resolve drift caused by dust or software calibration without any disassembly.
For diagnosis and repair steps, see our controller deadzone guide.
Is Nintendo Joy-Con repair free?
It depends on your region and the specific issue. Nintendo has offered free or discounted repair for control stick drift under certain conditions in some regions, including parts of Europe. Check Nintendo’s official support page for your country to see current eligibility before paying for a third-party repair.
How long does Joy-Con repair take?
Official Nintendo service typically takes one to two weeks, including shipping. A DIY repair kit fix, once you have the parts, usually takes 30 to 60 minutes for stick replacement and less for cleaning or button repairs.
What causes Joy-Con drift in the first place?
Drift is most often caused by wear inside the analog stick’s potentiometer or dust and debris building up around the stick mechanism. Over time, this makes the stick register movement even when it is not being touched.
Do I need special tools to replace a Joy-Con stick?
Yes. Joy-Con repair typically requires a Y00 tripoint screwdriver, a small Phillips screwdriver, a plastic prying tool and often a soldering iron for stick replacement, since the analog stick module is soldered to the board on most models.
Will repairing my Joy-Con void my warranty?
Opening a Joy-Con that is still under warranty can void that warranty. If your controller is still covered, use Nintendo’s official service instead of a DIY repair kit.
About the Author
The PadProTools Editorial Team writes controller testing and troubleshooting guides for players who want to check input problems before replacing hardware. Our guides focus on practical testing, official support steps, and clear repair decisions.
Reviewed sources include Nintendo Support for official troubleshooting steps, iFixit for Joy-Con parts and repair context, and MDN Web Docs for browser gamepad input behavior. Nintendo Support states that Joy-Con control stick issues should be checked with updates, calibration, and service when calibration does not solve the problem. iFixit’s Joy-Con device page lists repair areas such as batteries, charging rails, left and right joysticks, SL/SR button boards, buttons, cables, cases, and toolkits.
Related Tools
Before you buy a repair kit, test your controller with these tools.
- Gamepad tester
- Test your controller online
- gpu tester
- Controller button test
- Nintendo Switch controller test
- keyboard test
- Controller not working guide
Closing Summary
The best Nintendo Switch Joy-Con repair path starts with testing. If the stick drifts in both a gamepad tester and the Switch calibration screen, try calibration first. If the issue returns, clean carefully or consider a repair kit, local repair, Nintendo service, or full replacement. If the tester shows the Joy-Con works correctly, check the game settings, button mapping, or wireless connection before spending money.
For diagnosis and repair steps, see our PS4 stick drift test and fix.


One Comment