Controller Joystick Replacement: Fixing Stick Drift on PS5, Xbox, Switch & More
By Airam Chandler
Last updated: August 22, 2026
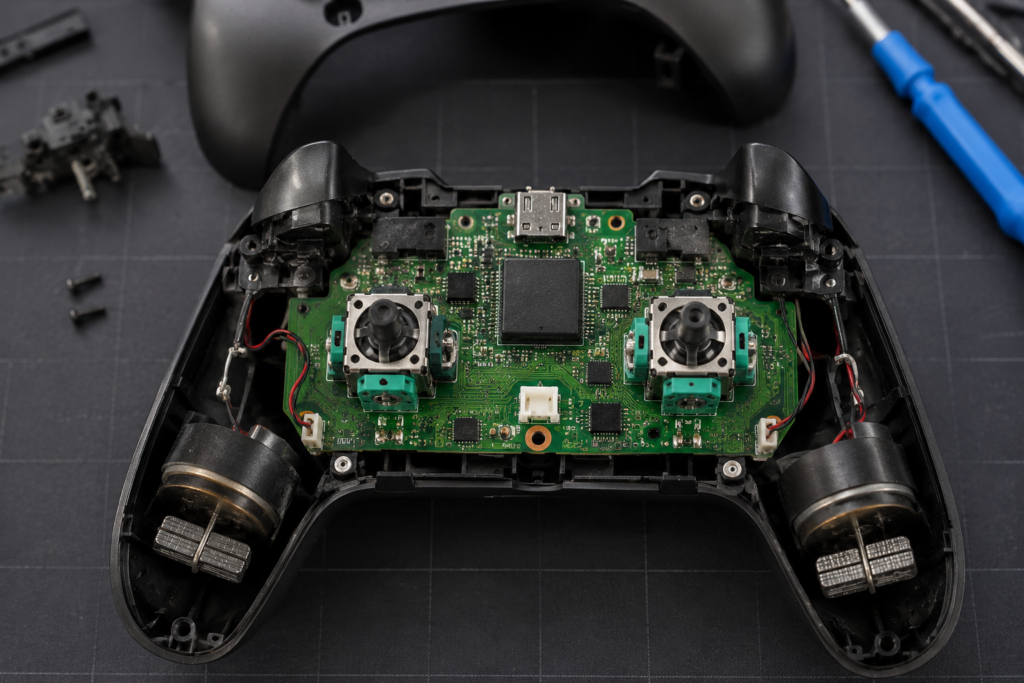
If your controller drifts, doesn’t return to center, or feels unresponsive, the joystick is the usual suspect, but not always the actual cause. Dirt, a bad calibration, outdated firmware, or an aggressive dead zone setting can all mimic stick drift closely enough to fool most people into an unnecessary repair.
This guide walks through diagnosis, the repair vs. replace decision, parts and tools, full step-by-step instructions for every major controller, and the after-repair checks that most guides skip. Everything below reflects hands-on repairs, including the exact error rate numbers, part names, and failure points that a normal walkthrough won’t tell you.
What Is Controller Joystick Replacement?
Controller joystick replacement means removing a worn or damaged analog stick module and installing a new one. Inside every modern joystick are sensors that track X-axis and Y-axis movement. As those sensors wear, the controller starts reporting movement you didn’t make (stick drift), or fails to register small movements at all.
Replacement isn’t always step one, though. A large share of “broken” controllers just need cleaning, a firmware update, or recalibration. Diagnosing correctly first saves you from desoldering a joystick that was never actually the problem.
Step 1: Diagnose Before You Open Anything
Symptoms of a worn joystick, a bad dead zone setting, and a loose connection can look identical from the couch. Here’s how to tell them apart in under two minutes.
Test it first. Connect the controller to a PC and open a browser-based gamepad tester. Watch the on-screen stick indicator:
- A healthy stick returns close to center and stays still when you let go.
- Continuous drift on the indicator, not just in-game, confirms hardware wear.
- Jerky or stepped movement, rather than smooth, usually points to sensor contamination or wear rather than a clean failure.
Rule out software causes before you blame hardware:
| Cause | How to check | Fix |
|---|---|---|
| Dead zone set too low | Check in-game or system controller settings | Increase dead zone |
| Outdated firmware | Check console/app for controller updates | Update firmware |
| Bluetooth interference | Test the same behavior over a wired USB connection | Switch to wired to isolate |
| Uncalibrated stick | Compare tester reading before and after recalibration | Run platform calibration |
| Dirt or oil buildup | Sudden onset, controller hasn’t been cleaned recently | Clean before replacing anything |
If the drift persists after cleaning, calibration, and a firmware update, and shows up across multiple games and both wired and wireless connections, the joystick module itself is worn. Move to replacement.
Step 2: Repair, Replace, or Buy New?
Most drifting controllers are otherwise fine. The failure is usually confined to a $3 to $15 module, not the whole board.
| Option | Best for | Cost | Skill | Time | Long-term value |
|---|---|---|---|---|---|
| DIY joystick replacement | Comfortable with small electronics | Low to Moderate | Intermediate | 1 to 3 hrs | Excellent if done correctly |
| Professional repair | No tools or soldering experience | Moderate | None | 2 to 7 days | Very good |
| New controller | Multiple hardware failures, liquid damage | Highest | None | Immediate | Good, but often temporary |
The catch with “just buy a new one”: most stock controllers still ship with the same contact-based potentiometer design that failed in the first place. You’re not fixing the failure mode; you’re restarting its clock. In independent bench testing, standard potentiometer modules showed error rates up to 16%, versus roughly 5% for TMR modules. The technology, not the age of the controller, is the bigger variable in how soon drift returns.
Skip repair entirely if there’s liquid damage, the main board is damaged, several buttons have failed independently of the stick, the battery won’t hold a charge, or you’ve already replaced the joystick once, and it failed again quickly. At that point, the parts cost approaches that of a new controller, and the time isn’t worth it.
For diagnosis and repair steps, see our PS5 controller troubleshooting.
Step 3: Tools and Parts
Beginner toolkit (works for cleaning, calibration checks, and no-solder repairs)
- Precision screwdriver set (Y00/T6/T8 bits cover PS5, Xbox, and Switch)
- Plastic opening pick and spudger
- Tweezers
- Magnetic screw tray
- 90%+ isopropyl alcohol and a microfiber cloth
Soldering required repairs, add:
- Temperature-controlled soldering iron (a basic adjustable iron in the 300 to 350°C range is enough, you don’t need a rework station for this job)
- Leaded or lead-free solder, thin gauge
- Flux
- Desoldering pump or copper braid
- PCB holder or “helping hands”
Repair kits worth knowing by name (verify compatibility with your exact model before buying)
- iFixit Fix Kits. Reliable OEM-spec tools and modules, higher price.
- GuliKit HD/KK3 Max. Widely used third-party Hall Effect and TMR replacement modules for PS5, Xbox, and Switch, with a strong community track record.
- JunZeng TMR modules. Common in aftermarket TMR upgrades, price competitive.
- Search by your controller’s exact model number, for example “DualSense CFI-ZCT1W joystick module,” not just “PS5 joystick,” since revisions differ internally even when the shell looks the same.
Step 4: Choosing a Replacement Module
| Standard potentiometer | Hall Effect | TMR | |
|---|---|---|---|
| Sensing method | Physical contact | Magnetic | Magnetic (tunnel magnetoresistance) |
| Typical error rate* | Up to 16% | Lower, contact-free | Around 5% |
| Drift resistance | Moderate | High | Very high |
| Price | Lowest | Moderate | Moderate to High |
| DIY availability | Excellent | Good | Growing |
If you’re already opening the controller to fix drift, upgrading to Hall Effect or TMR is usually a small cost increase for a meaningfully longer interval before it happens again. It won’t make the stick immortal; springs and housings still wear, but it removes the dominant failure mode.
Genuine (OEM) vs. third-party: OEM parts fit correctly by default but are harder to source individually. Third-party quality varies widely, so buy from suppliers with visible reviews tied to your specific controller model, not just star ratings on a generic listing.
Step 5: Platform-by-Platform Replacement Steps
Confirm your exact model number before ordering parts. Hardware revisions that look identical externally often aren’t internally.
PS5 DualSense
Difficulty: Intermediate · Time: 1.5 to 3 hrs · Solder required: Yes
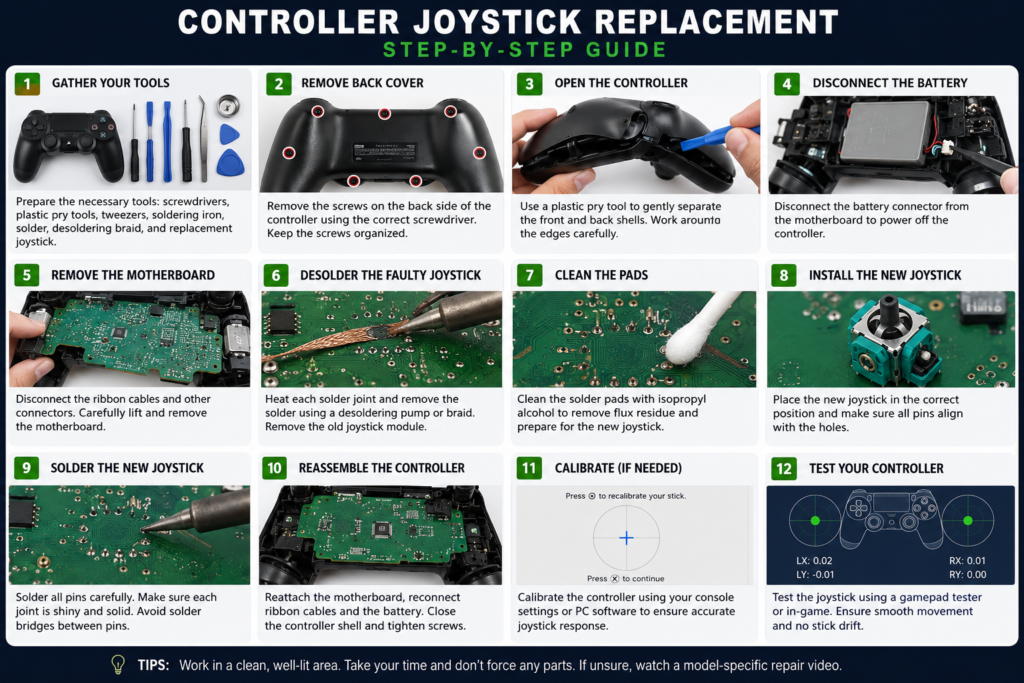
- PS5 DualSense: Remove the back panel screws and separate the shell with a plastic opening tool, working around the edge. Don’t force the clips near the trigger housings; they crack easily.
- Disconnect the battery connector immediately.
- Lift the motherboard, releasing each ribbon cable connector before sliding the cable out. Never pull the cable itself.
- Apply flux to the joystick module’s solder points, heat each one, and clear it with a desoldering pump or braid before lifting the module straight up and out.
- Seat the new module flat against the board. Check that it isn’t tilted before soldering a single pin.
- Solder each pin. Joints should be smooth and shiny with no bridging between adjacent pins.
- Reconnect the ribbon cables and the battery, then power on before closing the shell to confirm it works.
- Reassemble, then calibrate and test (Step 6 below).
Common mistakes: overheating PCB pads (lift the iron the moment solder flows, don’t linger), pulling ribbon cables by the cable body instead of releasing the connector latch first, and closing the shell before verifying the repair works.
For diagnosis and repair steps, see our DualSense trigger troubleshooting.
PS4 DualShock 4
Difficulty: Intermediate · Time: 1 to 2.5 hrs · Solder required: Yes
PS4 DualShock 4 The process mirrors the DualSense almost exactly, with two differences worth knowing before you start:
- Housing screws are positioned slightly differently depending on revision (CUH-ZCT1 vs. CUH-ZCT2). Photograph screw positions as you remove them.
- Ribbon cable routing near the touchpad varies by revision. Note the routing before disconnecting so reassembly is a straight reversal.
Otherwise, the order is the same: disconnect battery, remove motherboard, desolder old module, install and solder new module, reassemble, test power on before final close, then calibrate.
Xbox Series X/S Controller
Difficulty: Intermediate · Time: 2 to 3 hrs · Solder required: Yes
- Remove the rear grips first. They’re held by clips, not screws, and crack if pried from the wrong edge. Start at the bottom corner and work up.
- Remove the security bit screws underneath (T8 with a center pin, not a standard Torx).
- Separate the front and back shells carefully. The battery compartment contacts and trigger springs sit loose here and can fall out.
- Disconnect the battery, then lift the motherboard free.
- Desolder the faulty joystick module (same technique as DualSense: flux, heat, clear each joint).
- Install and solder the replacement module, checking it sits flush.
- Reassemble in reverse, watching for the trigger springs and rear grip clips to seat fully.
- Power on before final reassembly to confirm the repair worked.
Common mistakes: losing trigger springs during shell separation (work over a tray), cracking rear grip clips by prying from the top instead of the bottom seam, and using the wrong replacement module. Series X/S modules are not interchangeable with Xbox One modules despite looking similar.
Xbox One / Xbox 360 Controller
Difficulty: Intermediate · Time: 1.5 to 2.5 hrs · Solder required: Yes
Older Xbox controllers have larger internal components than current-gen ones, which makes the soldering slightly more forgiving for a first-timer, though the process is otherwise the same: open the shell, disconnect the battery pack, remove the board, desolder the old stick, solder in the new one, then test each direction before fully closing the housing. The Xbox 360, in particular, is known for stick drift traced to the solder joints themselves working loose over time, not just sensor wear. If drift reappears shortly after a first repair, recheck joint quality before assuming the new module is defective.
For diagnosis and repair steps, see our PS5 stick replacement guide.
Nintendo Switch Joy-Con
Difficulty: Beginner to Intermediate · Time: 30 to 60 min · Solder required: No (ribbon cable connection)
- Remove the rear screws. You’ll need a Y00 tri-wing bit for most of them, plus a standard Phillips for one or two.
- Open the shell carefully. The shoulder button and rail spring mechanisms sit loose and can launch across the room if you’re not working over a tray.
- Disconnect the battery.
- Lift the battery tray, then unclip the joystick’s ribbon cable connector. Flip the small black locking tab up first; don’t pull the cable against a locked connector.
- Remove the old joystick module and clip in the new one.
- Reconnect the ribbon cable, seat the connector lock back down, then replace the battery tray and battery.
- Test before final reassembly, then calibrate.
Common mistakes: forgetting to unlock the ribbon connector before removing the cable (tears the cable), and losing the shoulder button spring during shell separation.
Nintendo Switch Pro Controller
Difficulty: Intermediate · Time: 1.5 to 2 hrs · Solder required: Yes
Internally closer to a PlayStation or Xbox controller than to a Joy-Con: more screws, a larger board, and a soldered module rather than a clip-in ribbon cable. The extra interior space makes the actual soldering easier than with DualSense or Xbox, despite the longer step count: open shell, disconnect battery, remove board, desolder, install and solder new module, reassemble, calibrate, then test.
Generic PC Controllers
Many budget third-party pads copy PlayStation or Xbox internal layouts closely enough that standard modules fit, but some use proprietary parts that can’t be replaced with off-the-shelf modules at all. Check your specific model number against the module manufacturer’s compatibility list before ordering. Don’t assume “looks the same” means “is the same.”
Step 6: Calibrate and Test. Don’t Skip This.
A new module doesn’t know its own center position until you calibrate it. Skipping this step is the single most common reason people report “the new stick still drifts.”
Calibration by platform:
- PS5/PS4: Calibration options are limited on console; if your replacement kit includes a calibration utility, use it. Power cycle the controller after installing it, before testing.
- Xbox: Use the Xbox Accessories app’s calibration tool.
- Switch: Use the console’s built-in controller calibration menu (System Settings, then Controllers and Sensors, then Calibrate Control Sticks).
- PC: Windows’ built-in game controller calibration panel works for most USB and Bluetooth-paired pads.
Then run the same gamepad tester check you did during diagnosis and compare against your original screenshot:
- Center position holds steady with no drift.
- Full range of motion in every direction, with no dead spots.
- Smooth circular movement when rotating the stick around its edge. Sharp corners or hitches usually mean a calibration or seating issue, not a bad module.
- Verify every button, trigger, and stick click still works. A loose connector from reassembly is far easier to fix now than after the shell is fully closed.
What’s normal in the first few sessions: the new stick may feel slightly firmer or have marginally different resistance than the worn original; that’s expected and settles in. What’s not normal: continuous drift, jerky or stepped movement, missing directions, or a grinding or clicking sound. Any of those means reopening and checking the install before assuming the part itself is defective.
For diagnosis and repair steps, see our PS5 controller drift fix.
Common Mistakes That Cause Repeat Failures
- Overheating solder pads. This lifts copper traces and turns a simple repair into a board-level one. Use a temperature-controlled iron, apply flux first, and don’t linger on any single joint.
- Wrong module for your revision. Verify model number and hardware revision before ordering, not after.
- Pulling ribbon cables by the cable instead of releasing the connector latch. This is the most common cause of a “dead” controller after an otherwise clean repair.
- Closing the shell before testing. Always power on and verify before final reassembly.
- Skipping calibration. This leaves a correctly installed module reporting inaccurate center and range.
Preventing Future Drift
- Clean around the stick base periodically. Dust and skin oil are the leading causes of early drift, well before genuine sensor wear sets in.
- Avoid forcing the stick against its mechanical limit repeatedly. Smooth, controlled input stresses the module less than aggressive full-range snapping.
- Keep firmware current. It won’t fix worn hardware, but it does resolve some input accuracy bugs that get mistaken for drift.
- If you’re replacing anyway, a Hall Effect or TMR module meaningfully extends the interval before this repair is needed again. See the error rate comparison above.
What Does This Actually Cost?
- DIY: mainly the module itself ($3 to $25 depending on type) plus reusable tools (about $20 to $40 one time if you don’t already own a soldering iron and screwdriver set).
- Professional repair typically covers parts, labor, and turnaround. Get a specific quote before sending a controller in, since pricing varies by model and by whether it’s a flat-rate drift fix or a full diagnostic.
- New controller: highest upfront cost, and per the error rate data above, doesn’t necessarily buy you more time before the same failure returns, unless the replacement specifically uses Hall Effect or TMR sticks.
FAQS
Can stick drift be fixed without replacing the joystick?
Yes, if it’s caused by dirt, calibration, firmware, or dead zone settings rather than genuine sensor wear. Clean, update firmware, recalibrate, and retest with a gamepad tester before assuming you need a new module.
Do all joystick replacements require soldering?
No. Most PlayStation and Xbox controllers do. Joy-Con sticks connect via a ribbon cable and don’t require soldering. Some aftermarket kits offer modular, solder-free installs for other controllers too, so check compatibility first.
Can I replace just one joystick?
Yes. You only need to replace the stick that’s actually failing. Some people replace both at once if the controller is old enough that the second is likely to fail soon anyway, purely to avoid opening it twice.
Will replacing the joystick void my warranty?
Often, yes. Opening the shell or breaking warranty seals typically voids manufacturer coverage. If your controller is still under warranty, use official repair or replacement channels first.
For diagnosis and repair steps, see our reset a PS5 controller.
Are Hall Effect or TMR joysticks actually better?
Based on published bench comparisons, yes. TMR modules showed roughly 5% error rates versus up to 16% for standard potentiometers in independent testing. Both use magnetic sensing instead of physical contact, which is the actual mechanism that resists drift, not just marketing language.
Why is my controller still drifting after I replaced the joystick?
Most often, it’s a skipped calibration, a poor solder joint, a slightly misaligned module, or a low-quality replacement part. Rerun the gamepad tester check, and if drift persists, reopen and inspect the solder joints before assuming the module itself is bad.
Key Takeaways
- Diagnose before you open the controller. Cleaning, firmware, and calibration fix a meaningful share of “drift” cases with zero disassembly.
- Most PlayStation and Xbox joystick replacements require soldering; Joy-Cons don’t.
- TMR and Hall Effect modules meaningfully outperform standard potentiometers on drift resistance (around 5% vs. up to 16% error rate in bench testing), worth the small cost increase if you’re already opening the controller.
- Calibrate and test after every repair, before final reassembly. Most “the repair didn’t work” reports trace back to a skipped calibration step, not a bad part.