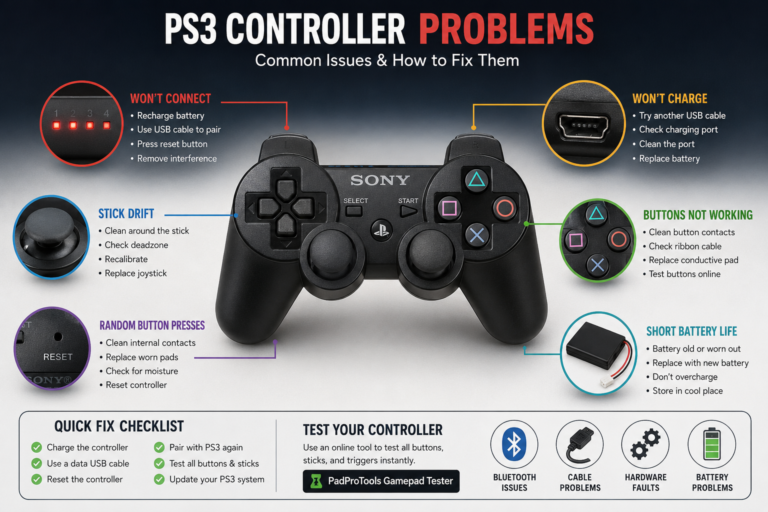
PS5 DualSense Trigger Not Working or Stuck? L2 and R2 Fixes (Complete Troubleshooting Guide)
Quick answer: most PS5 trigger problems are caused by a broken spring, dust buildup, a loose ribbon cable, or outdated firmware, not a dead controller. Start with a firmware update and a controller reset. If L2 or R2 still sticks, feels loose, doesn’t register, or fires on its own after that, the fix usually involves cleaning, repositioning the spring, or replacing a part, all covered step by step below after the replacement triggers check work properly or not on check stick drift online.
If your PS5 DualSense trigger is stuck, not responding, always pressed, or feels loose, don’t assume you need a new controller. In many cases, the problem is caused by dust, a worn trigger spring, a loose ribbon cable, outdated firmware, or a damaged trigger assembly. Start with simple software and cleaning checks before opening the controller. If the issue is hardware-related, identifying the exact symptom first can save time, money, and unnecessary repairs.
A trigger problem can ruin the experience in racing games, shooters, and sports titles where the L2 and R2 buttons are used constantly. Sometimes the trigger stays pressed. Other times it won’t register at all, feels loose, or loses its resistance. The good news is that many of these problems can be diagnosed at home without replacing the entire controller.
This guide walks through every stage of troubleshooting, from quick software fixes to hardware repairs. You’ll also learn how to identify the exact cause before taking your controller apart and how to test whether the repair actually worked.
Identify Your Exact PS5 DualSense Trigger Problem
Not every trigger problem has the same cause. Before trying any fix, identify the symptom that matches your controller.
L2 or R2 Trigger Is Physically Stuck
If the trigger stays pressed or doesn’t return to its normal position after you release it, the most common causes include a broken trigger spring, dirt or debris inside the trigger housing, a damaged trigger mechanism, or physical damage from a drop. This is usually a hardware problem rather than a software issue.
L2 or R2 Trigger Won’t Spring Back
A trigger should move smoothly and return to its original position every time you release it. If it doesn’t, check for a snapped or stretched spring, a spring that has slipped out of position, or internal damage around the trigger assembly. Many users discover this after hearing a small click followed by a loose trigger. Community repair reports frequently point to damaged or displaced trigger springs as a common cause.
L2 or R2 Trigger Feels Loose
A loose trigger often means one of the internal components is no longer holding proper tension. Possible causes include a broken spring, worn trigger housing, damaged trigger clips, or adaptive trigger mechanism wear. The trigger may still work, but it usually feels much lighter than the opposite side.
L2 or R2 Trigger Doesn’t Register Input
The trigger moves normally, but games don’t respond. Possible causes include a firmware issue, a dirty connector, a loose ribbon cable, a trigger sensor fault, or a damaged trigger module. Before opening the controller, always rule out software by resetting and updating it.
L2 or R2 Trigger Is Always Pressed
This is sometimes called a phantom trigger press. You might notice your character keeps aiming, your vehicle keeps accelerating, or weapons fire without touching the trigger. This can happen when the trigger sensor, ribbon cable, or internal contact isn’t working correctly. Repair communities have also reported cases where debris, a misaligned internal contact pad, or ribbon cable issues caused constant trigger input.
Trigger Works Only Sometimes
Intermittent problems are often harder to diagnose. The issue may appear only during certain games, after long gaming sessions, when pressing at a specific angle, or when using Bluetooth but not USB. This doesn’t automatically mean the trigger is broken. It could point to a software issue, a loose internal connection, or an early hardware fault.
Adaptive Trigger Clicks or Activates by Itself
If you hear clicking, grinding, or unexpected resistance even when a game isn’t using adaptive triggers, the problem could involve the adaptive trigger motor, the trigger gear, firmware, or the internal mechanism. Testing with adaptive triggers disabled can help determine whether the issue is mechanical or software-related.
Quick Symptom Guide
| Symptom | Most Likely Cause | Start With |
|---|---|---|
| Trigger stuck down | Broken spring or debris | Cleaning and inspection |
| Trigger feels loose | Spring or trigger assembly | Compare both triggers |
| Trigger doesn’t register | Sensor, ribbon cable, firmware | Reset and input testing |
| Trigger always pressed | Ribbon cable, sensor, internal contact | Software checks first |
| Trigger clicks or squeaks | Spring or adaptive trigger mechanism | Listen and compare both sides |
| Trigger works inconsistently | Loose connection or early hardware failure | Test in different games and over USB |
Starting with the correct symptom helps you avoid unnecessary repairs.
How the PS5 DualSense Trigger Works
Understanding how the trigger works makes troubleshooting much easier. When you press L2 or R2, several parts work together.
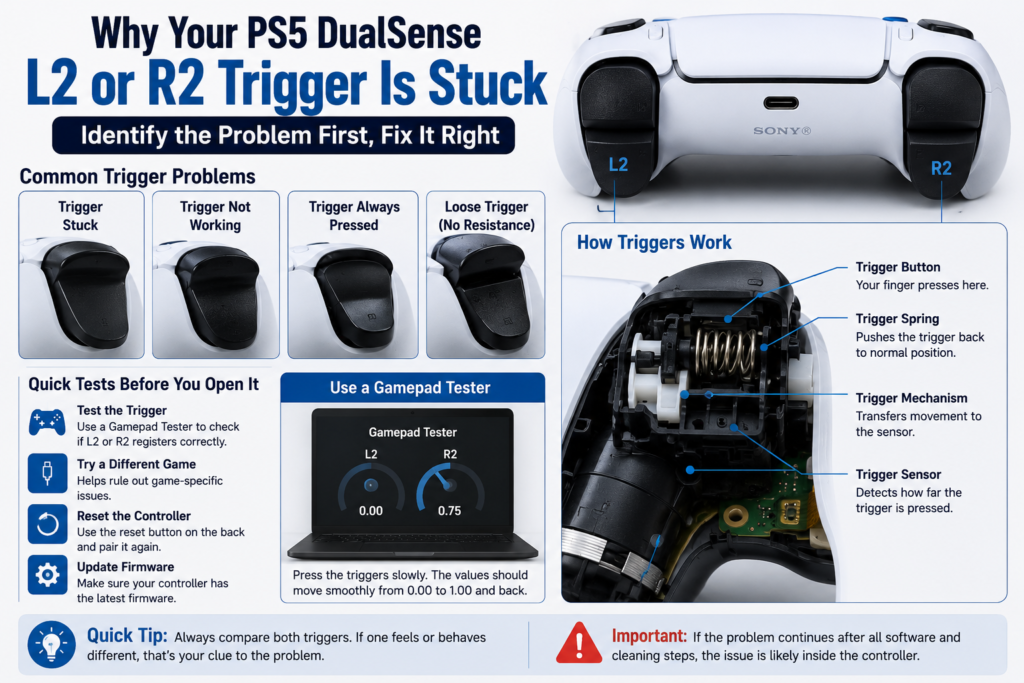
Trigger Button
This is the plastic button your finger presses. It rotates on a pivot and transfers movement to the internal mechanism.
Trigger Spring
The spring pushes the trigger back into its normal position after every press. If it breaks or slips out of place, the trigger may feel loose, stay down, lose resistance, or make clicking noises. This is one of the most commonly reported hardware failures in DualSense controllers.
Adaptive Trigger Mechanism
Unlike older controllers, the DualSense uses adaptive triggers that can change resistance during gameplay. Compatible games can make the trigger harder to press, easier to press, vibrate, or simulate different actions. If this mechanism develops a fault, the trigger may behave unexpectedly even though the spring is intact.
Trigger Sensor
The sensor measures how far the trigger moves. If it fails or cannot communicate correctly with the controller board, the trigger may stop registering or appear to stay pressed.
Ribbon Cable
A thin ribbon cable connects the trigger assembly to the controller’s main board. If it becomes loose, dirty, or damaged, you may notice missed inputs, constant trigger activation, or random trigger presses. Repair discussions have identified ribbon cable alignment and contamination as recurring causes of trigger-related issues.
Know Your Controller Version Before Attempting Any Repair
Not every DualSense controller is built the same. Sony has released multiple hardware revisions, and some internal parts differ between models. Common versions include BDM 010, BDM 020, BDM 030, later hardware revisions, and the DualSense Edge.
Why the Model Matters
The controller version affects the internal layout, ribbon cable routing, trigger assembly, replacement parts, and repair procedures. Ordering the wrong replacement spring, ribbon cable, or trigger module can make the repair more difficult.
How to Check Your Controller Version
The easiest way is to check the label on the back of the controller for the model information, or identify the motherboard revision after opening the controller if you’re already performing a repair. If you’re only troubleshooting, you don’t need to open the controller yet. Begin with the software and no tool checks first. Only move to disassembly after you’ve ruled out simpler causes.
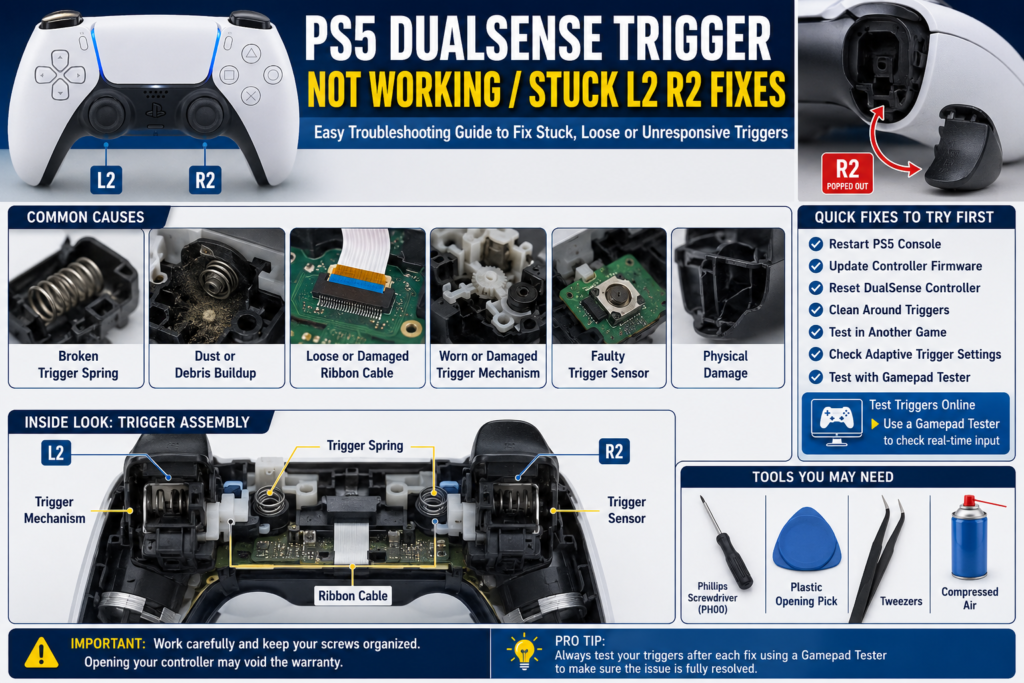
What Causes a PS5 DualSense Trigger to Stop Working?
Finding the real cause before attempting a repair can save both time and money. While some trigger problems are caused by software, most physical trigger issues happen because one or more internal parts are no longer working as intended.
Broken Trigger Spring
A broken or stretched trigger spring is one of the most common reasons an L2 or R2 button stops feeling normal. When the spring fails, you may notice the trigger stays pressed, feels loose, has little or no resistance, makes a clicking or squeaking sound, or doesn’t return after you release it. If you recently heard a small snap before the problem started, the spring is a strong suspect.
Dust, Dirt, or Debris
Dust can build up around the trigger opening over time. Small particles may prevent the trigger from moving freely or stop it from returning smoothly. This is more common if the controller is used frequently or stored in dusty environments. Fortunately, this is one of the easiest problems to fix.
Ribbon Cable Problems
The ribbon cable carries signals between the trigger assembly and the controller’s main board. If it becomes loose, dirty, folded, or damaged, the controller may detect the trigger constantly, ignore trigger presses, register random inputs, or work only occasionally. Because the ribbon cable is delicate, it should only be handled carefully during repairs.
Trigger Sensor Failure
The trigger sensor measures how far you press L2 or R2. If it fails, the trigger may stop responding, stay at one input value, register partial input only, or jump between values unexpectedly. This usually requires inspection after basic troubleshooting has been completed.
Adaptive Trigger Mechanism Problems
One of the biggest differences between the DualSense controller and older PlayStation controllers is the adaptive trigger system. If part of this mechanism develops a fault, you might notice unexpected resistance, clicking noises, trigger locking, trigger activating by itself, or different resistance between L2 and R2. Sometimes disabling adaptive triggers in supported games can help confirm whether the issue is related to this system.
Physical Damage
Dropping the controller can damage trigger clips, internal plastic guides, trigger housing, springs, and ribbon cable connections. Even if there are no visible cracks, internal parts may shift out of place after an impact.
Firmware or Software Issues
Although less common than hardware failures, software can occasionally cause problems. Possible causes include outdated controller firmware, temporary software glitches, corrupted controller settings, or game-specific bugs. These issues are much easier to fix than hardware damage, so it’s always worth checking them first.
Before You Open the Controller: Quick Diagnostic Checklist
Don’t reach for a screwdriver immediately. A few simple checks can help narrow down the problem.
Does the Trigger Move Normally?
Press both L2 and R2 several times. Ask yourself if they feel the same, if one feels softer, if one stays pressed, or if one clicks differently. Comparing both triggers often reveals the problem quickly.
Does the Trigger Return Smoothly?
Release the trigger slowly. A healthy trigger should return to its normal position without sticking or hesitating. If it moves slowly or stops halfway, the spring or trigger mechanism may need attention.
Does the Trigger Register Correctly?
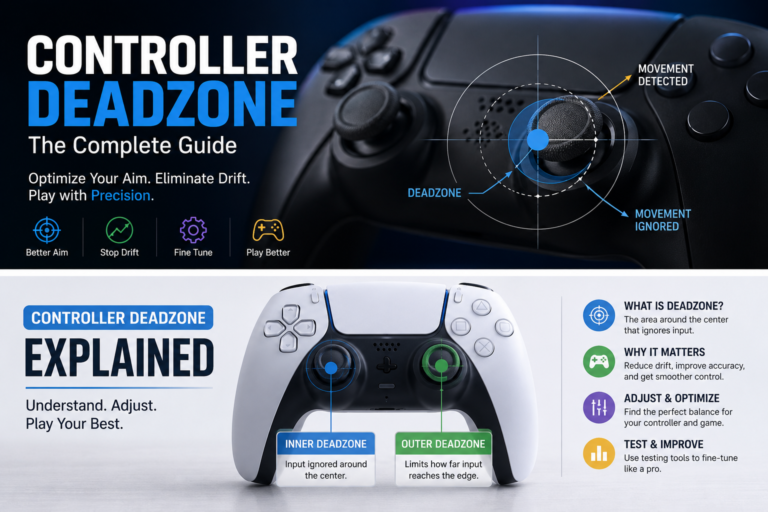
Sometimes the trigger feels perfectly normal but the console doesn’t detect it. Before assuming a hardware failure, verify whether the controller is actually receiving the input. A reliable gamepad tester lets you watch the trigger value change as you press and release L2 or R2. If the value never changes, stays partially pressed, or jumps unexpectedly, you’ve already narrowed down the possible causes.
Does It Work in Another Game?
Some games use adaptive triggers differently. If the trigger works normally in one game but not another, the problem could be game settings, game specific bugs, or adaptive trigger configuration. Testing more than one title helps rule out software conflicts.
Does It Work Over USB?
Connect the controller using a USB cable. If the problem disappears, Bluetooth communication may be contributing to the issue. If the problem remains exactly the same, focus on the controller itself.
Has the Controller Been Dropped?
Think back to when the problem started. If the controller recently fell onto a hard surface, inspect it carefully before assuming it’s a software issue. Physical impacts often damage internal trigger components even when the outside looks fine.
No Tools Fixes to Try First
Always begin with the safest fixes. Many trigger problems can be solved without opening the controller.
Restart the PS5 Console
It sounds simple, but temporary software glitches do happen. Turn the console off completely, wait a minute, then power it back on before testing the controller again.
Update the Controller Firmware
Sony regularly releases firmware updates that improve controller performance and fix bugs. To check for updates, connect the controller with a USB cable, open the PS5 settings, check for available controller firmware updates, install any pending updates, then restart the controller. If the trigger problem appeared after a long period without updates, this is worth trying before moving on.
Reset the DualSense Controller
A hardware reset clears temporary controller settings. To reset the controller, turn off the PS5, locate the small reset hole on the back of the controller, press the reset button using a paper clip or similar tool for about five seconds, connect the controller using a USB cable, then pair it with the console again. If the issue was caused by a temporary software problem, the trigger may begin working normally again.
Pair the Controller Again
Sometimes communication problems develop between the controller and the console. Remove the controller from the paired devices list, reconnect it using USB, and pair it again before testing the triggers.
Test Another USB Cable
Some charging cables only supply power. If possible, use a USB cable that supports both charging and data transfer while testing the controller.
Test Another Game
Not every game uses adaptive triggers in the same way. Testing another title helps determine whether the issue is tied to a specific game or affects every application.
Temporarily Disable Adaptive Triggers
Some games allow you to reduce or disable adaptive trigger effects. Turn the feature off temporarily. If the trigger suddenly behaves normally, the adaptive trigger mechanism or game settings may be involved rather than the basic trigger movement itself.
Remove Dust Around the Trigger
Without opening the controller, inspect the small gap around the trigger. If you notice dust or debris, blow away loose particles with compressed air and press the trigger several times while cleaning. Avoid inserting sharp objects into the gap, and never spray liquids directly into the controller. Even a small amount of debris can affect trigger movement.
Fully Charge the Controller
A very low battery is unlikely to cause a stuck trigger, but charging the controller eliminates one more possible variable before moving to hardware troubleshooting.
Test the Trigger Before Opening the Controller
After completing these checks, test both triggers again. Watch for smooth movement, full trigger travel, equal resistance, accurate input detection, and no unexpected trigger presses. If everything works normally, there’s no reason to open the controller. If the same symptoms remain after every software and cleaning step, it’s time to inspect the internal trigger components more closely.
Verify the Trigger Before Opening the Controller
If the quick fixes didn’t solve the problem, don’t rush into taking the controller apart. First, confirm exactly how the trigger is behaving. This helps you avoid replacing parts that are still working properly.
Test Whether L2 and R2 Register Correctly
Connect your controller to a trusted gamepad tester and slowly press both triggers from start to finish. A healthy trigger should respond as soon as you begin pressing it, move smoothly through its full input range, reach maximum input when fully pressed, and return to zero immediately after you release it. If one trigger behaves differently from the other, you’ve already narrowed down the issue.
Check for Partial Trigger Input
Sometimes the trigger only registers part of its movement. For example, you may fully press R2, but the tester only reports part of the available range. This often points to a worn trigger sensor, internal obstruction, trigger mechanism damage, or ribbon cable problems. Games that depend on gradual trigger pressure may feel inconsistent when this happens.
Look for Phantom Trigger Presses
Without touching the controller, watch the trigger values. If L2 or R2 appears partially pressed while your hands are off the controller, the problem is usually related to sensor faults, ribbon cable alignment, internal contamination, or trigger assembly damage. Testing before disassembly gives you a useful baseline for comparison after the repair.
Compare Both Triggers
One of the easiest diagnostic methods is comparing L2 and R2. Ask yourself if both triggers feel equally firm, move the same distance, return at the same speed, and register identical input values. Any noticeable difference can help identify which side needs attention.
Intermediate Fixes
If the software isn’t responsible and testing confirms the trigger still has a problem, the next step is to inspect the internal components. Only continue if you’re comfortable opening the controller.
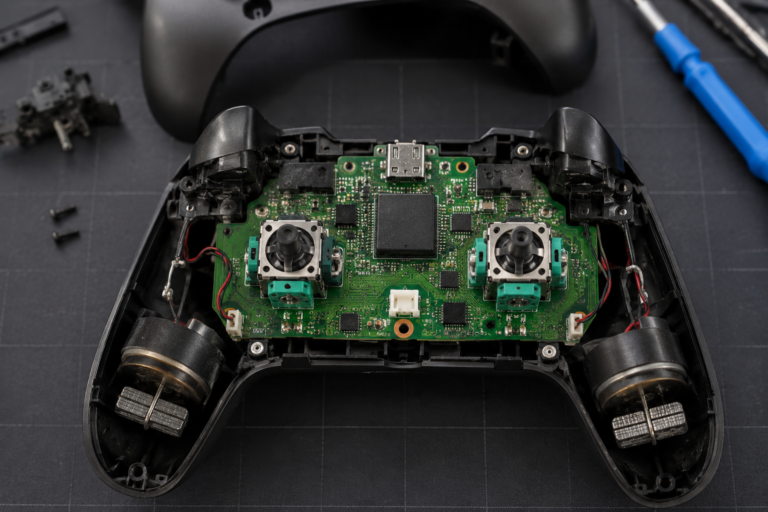
Clean the Internal Trigger Area
Dust can build up inside the trigger assembly over time. After opening the controller, inspect around the trigger pivot points, spring area, trigger housing, and moving plastic components. Use compressed air or a soft brush to remove loose debris. If additional cleaning is needed, apply a small amount of high-purity isopropyl alcohol to a lint-free swab rather than directly onto the controller. Allow everything to dry completely before reassembly.
Inspect the Trigger Spring
The spring is responsible for returning the trigger to its normal position. Carefully examine it for breaks, bent coils, stretching, or incorrect positioning. Even if the spring hasn’t snapped, it may have slipped away from its mounting points.
Reposition a Dislodged Trigger Spring
If the spring has simply moved out of place, repositioning it may restore normal trigger movement. Before reinstalling it, compare both trigger assemblies, make sure the spring sits correctly on both mounting points, and confirm the trigger moves freely before closing the controller. If the spring shows signs of damage, replacing it is usually the better option.
Inspect the Ribbon Cable
The ribbon cable should lie flat inside its connector. Look for loose connections, folded edges, dirt on the contacts, visible tears, or pinched sections. Never pull the ribbon cable forcefully. A damaged ribbon cable usually needs replacement rather than repair.
Check Trigger Alignment
While the controller is open, slowly move the trigger by hand. It should rotate smoothly, return naturally, stay aligned with the housing, and avoid rubbing against nearby plastic. If something catches during movement, inspect the surrounding parts before reassembly.
Inspect the Trigger Housing
Look closely for cracked plastic, broken retaining clips, excessive wear, or signs of impact damage. Even small cracks can prevent the trigger from moving correctly.
Advanced Repairs
These repairs involve replacing internal components. If your controller is still covered by warranty, consider that before opening it.
Replace the Trigger Spring
A replacement spring is one of the most common repairs for a loose or stuck trigger. Before installing a new spring, confirm the old spring is actually damaged, compare the replacement with the original, and check that both mounting points are intact. After installation, press the trigger several times before reassembly; make sure it returns smoothly and listen for unusual clicking sounds. The trigger should feel close to the opposite side when the repair is complete.
Replace the Ribbon Cable
If testing and inspection point to ribbon cable damage, replacement is often more reliable than attempting to repair it. During installation, route the cable exactly as intended, avoid twisting or sharply bending it, and ensure the connector locks securely. A poorly installed ribbon cable can create new input problems.
Replace the Trigger Assembly
If multiple trigger components are damaged, replacing the complete trigger assembly is often simpler than replacing each individual part. This is commonly recommended when the housing is cracked, multiple plastic parts are broken, the trigger pivot is damaged, or several internal components show wear.
Replace the Adaptive Trigger Mechanism
The adaptive trigger system contains additional moving parts compared with older PlayStation controllers. If the mechanism has failed mechanically, replacing the complete assembly is usually more practical than repairing individual pieces.
Reassemble the Controller Carefully
Before installing every screw, confirm the trigger moves freely, verify the spring remains in place, check ribbon cable routing, make sure the battery connector is secure, and inspect that no wires are trapped. Taking an extra minute here can prevent reopening the controller later.
Common Mistakes to Avoid
Many repairs fail because of small mistakes rather than faulty parts. Avoid these common problems.
Skipping Software Checks
Opening the controller before trying firmware updates or a reset can waste time if the issue is software-related.
Losing Small Parts
Keep screws and small components organized during disassembly. Using a magnetic parts tray or labeled containers makes reassembly much easier.
Forcing Plastic Clips
If a clip doesn’t release easily, stop and check for hidden screws. Excessive force can crack the controller shell.
Touching Ribbon Cable Contacts
Avoid touching the exposed contacts with your fingers. Oil and dirt can interfere with reliable connections.
Mixing Screw Locations
Some screws may have different lengths. Returning each screw to its original position helps prevent damage during reassembly.
Forgetting to Test Before Closing the Controller
Always verify trigger movement before reinstalling the outer shell. A quick functional test can save you from opening the controller again if something isn’t aligned correctly.
Adaptive Trigger Problems: Clicking, Auto Firing, or Strange Resistance
The adaptive triggers are one of the standout features of the DualSense controller. They can change resistance depending on what’s happening in a game, making actions like pulling a bowstring or pressing a car’s accelerator feel more realistic. When something goes wrong, however, the trigger may feel completely different from normal.
You might notice the trigger clicks even when you’re not playing, resistance suddenly disappears, the trigger feels heavier than usual, the trigger activates by itself, or L2 and R2 no longer feel the same. The first step is figuring out whether the problem is caused by software or damaged hardware.
Software-Related Adaptive Trigger Problems
Software issues usually appear after a game update, a controller firmware update, new console settings, or temporary system glitches. Common signs include the trigger working normally in some games, the issue disappearing after restarting the console, and the trigger behaving differently depending on the game.
Before assuming something is broken, try these steps: restart your PS5, update the controller firmware, test another game, turn adaptive trigger effects off temporarily, and pair the controller again. If the trigger returns to normal, you likely avoided an unnecessary repair.
Hardware-Related Adaptive Trigger Problems
If the trigger still behaves strangely after software checks, inspect the hardware. Possible causes include a broken trigger spring, worn trigger gears, a damaged trigger assembly, ribbon cable problems, or internal mechanism wear. These problems usually remain the same regardless of which game you’re playing.
How to Tell Whether It’s a Software or Hardware Problem
Before replacing parts, compare the symptoms below.
| Symptom | More Likely Software | More Likely Hardware |
|---|---|---|
| The trigger works after a restart | Yes | |
| Trigger works in one game only | Yes | |
| Trigger stopped after an update | Yes | |
| Trigger feels physically loose | Yes | |
| Trigger stays pressed | Yes | |
| Trigger won’t spring back | Yes | |
| Clicking inside the controller | Yes | |
| Broken plastic or visible damage | Yes | |
| Trigger value never changes during testing | Possible | Yes |
If the symptoms point toward hardware, continuing with software fixes usually won’t solve the problem.
Repair, Replace, or Use Your Warranty?
Once you’ve identified the problem, decide whether repairing the controller is worthwhile.
When Repair Makes Sense
Repair is often the better choice when only the trigger spring is damaged, the ribbon cable needs replacement, the trigger assembly has a single faulty component, you already have the required tools, or the controller is no longer covered by warranty.
When Replacement Is the Better Option
Replacing the controller may be more practical if multiple internal components are damaged, the main board has failed, the controller has suffered heavy impact damage, or repair costs approach the price of a replacement controller.
Should You Use the Warranty?
If your controller is still within the manufacturer’s warranty period and hasn’t been opened or damaged through misuse, contact Sony support before attempting a repair. Opening the controller yourself may affect warranty eligibility depending on your region and the specific circumstances.
How to Prevent Future Trigger Problems
While no controller lasts forever, good habits can reduce wear on the L2 and R2 triggers.
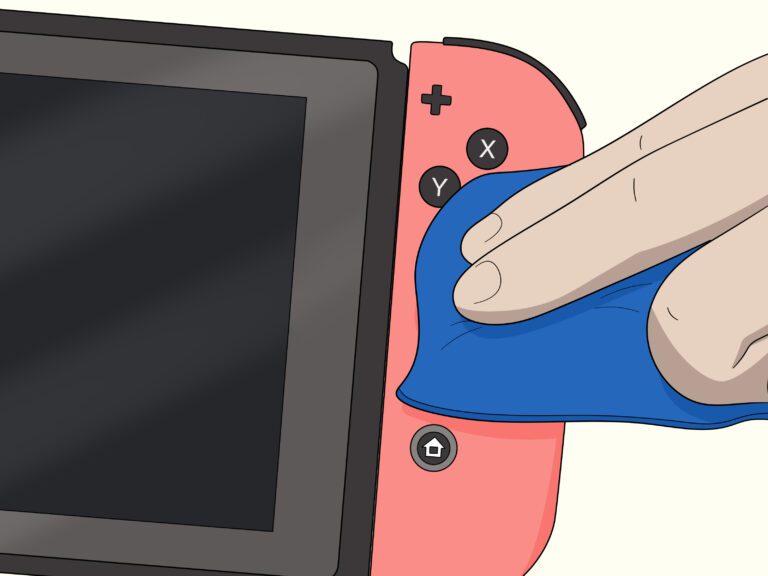
Keep the Controller Clean
Dust and small particles gradually build up around moving parts. Clean the controller regularly using a soft microfiber cloth and remove loose debris from the trigger openings with compressed air.
Avoid Excessive Force
Adaptive triggers are designed to provide resistance. If a trigger feels unusually stiff during gameplay, avoid forcing it harder than necessary.
Store the Controller Properly
When you’re finished playing, keep the controller in a clean, dry place, avoid leaving it where it can fall, and protect it from heavy objects.
Keep the Firmware Updated
Firmware updates don’t repair broken hardware, but they can improve stability and resolve software-related controller issues. Checking for updates regularly takes only a few minutes.
Test the Controller Occasionally
Even if you haven’t noticed a problem, occasional trigger testing can help identify changes before they become serious. If you notice reduced trigger travel, inconsistent input, or unusual resistance, addressing the issue early may prevent additional wear.
Related PS5 Controller Guides
If you’re troubleshooting other controller problems, these guides may also help: PS5 Controller Stick Drift Fix, DualSense Buttons Not Working, PS5 Controller Charging Problems, PS5 Controller Keeps Disconnecting, Adaptive Trigger Calibration Guide, and DualSense Edge Troubleshooting. Together, these guides create a complete troubleshooting hub and make it easier to diagnose controller issues that may appear related.
FAQS
Why does my PS5 controller trigger get stuck?
A stuck trigger is usually caused by a broken trigger spring, dirt inside the trigger housing, or damage to the trigger assembly. In some cases, a software issue or adaptive trigger setting can also affect how the trigger behaves. Start with simple troubleshooting before opening the controller.
Can I fix the L2 or R2 trigger without opening the controller?
Sometimes. Restart the console, update the controller firmware, reset the controller, clean around the trigger, and test it in another game. If the trigger still feels loose, stays pressed, or doesn’t register input, you’ll likely need to inspect the internal components.
How do I know if my trigger spring is broken?
A broken spring often causes the trigger to feel loose, lose its normal resistance, stay pressed, or fail to return after you release it. You may also hear a clicking or snapping sound when the problem first appears.
Why does my PS5 controller think the L2 or R2 button is always pressed?
This is often called a phantom trigger press. It can happen because of a faulty trigger sensor, a loose ribbon cable, dirt inside the controller, or a damaged trigger mechanism. Testing the controller before opening it helps confirm the issue.
Can dust stop the L2 or R2 trigger from working?
Yes. Dust and small debris can interfere with trigger movement or prevent internal parts from moving freely. Cleaning around the trigger with compressed air may solve the problem if the buildup is minor.
Why does my trigger work in one game but not another?
Some games use adaptive triggers differently, while others don’t use the feature at all. If the trigger works correctly in one game but not another, check the game’s controller settings, update the game, and verify that your controller firmware is current.
Does resetting the controller fix trigger problems?
A reset can resolve temporary software or communication issues. It will not repair broken springs, damaged ribbon cables, worn trigger assemblies, or other hardware failures.
Can a firmware update fix a stuck trigger?
A firmware update can correct software related bugs that affect controller behavior. However, it cannot repair physical damage inside the controller.
How do I test whether my L2 or R2 trigger is working correctly?
The easiest method is to connect the controller to a gamepad tester and slowly press each trigger. A healthy trigger should move smoothly through its entire input range and immediately return to its starting position when released.
Should I replace the trigger spring or the entire trigger assembly?
It depends on the damage. If only the spring has failed and the surrounding components are still in good condition, replacing the spring is usually enough. If the trigger housing, gears, or multiple internal parts are damaged, replacing the complete trigger assembly is often the better long term solution.
Is a stuck PS5 controller trigger covered under warranty?
If the controller is still within Sony’s warranty period and the damage isn’t caused by accidental misuse, you may be eligible for repair or replacement. Check your region’s warranty terms before opening the controller yourself.
How long do PS5 DualSense triggers usually last?
There isn’t a fixed lifespan. Trigger life depends on usage, game type, maintenance, and handling. Controllers used heavily for racing games, shooters, or other trigger-intensive games may experience wear sooner than lightly used controllers.
Final Thoughts
A PS5 DualSense trigger that is stuck, loose, or unresponsive doesn’t always mean the controller has reached the end of its life. Many issues can be traced to a simple software problem, dust buildup, a worn trigger spring, or a loose internal connection.
The best approach is to work through the fixes in order. Start with the quick software checks, confirm the symptoms, test the trigger, and only move to disassembly if the simpler solutions don’t work. This reduces the risk of unnecessary repairs and helps you identify the real cause more quickly.
After each troubleshooting step, test the controller again. If the L2 and R2 triggers move smoothly, register their full input range, and return normally after being released, you’ve likely solved the problem.
If the issue remains after completing every step in this guide, replacing the damaged component or contacting Sony support may be the next practical option.
Before putting the controller back into regular use, verify that both triggers respond correctly with your gamepad tester. A final input test only takes a minute and gives you confidence that the repair was successful.
If you found this guide helpful, explore our other PS5 controller troubleshooting articles for common issues like stick drift, charging problems, button failures, connection issues, and adaptive trigger calibration.