
PS5 Controller Stick Drift: Test It, Fix It, and Know When to Repair
Written by Alex Morgan and reviewed for accuracy by the PadProTools team.
Last reviewed: August 7, 2026
Quick Answer
PS5 controller stick drift happens when a DualSense sends left or right stick movement even though your thumb is not moving the stick. You may see your camera creep, your character walk alone, a menu scroll, or sprinting cut in and out check your stick drift after fix on Stick Drift Tester.
Start with a browser test. Then check another game, update the controller, reset it, clean around the stick, and review the game’s deadzone. If the same movement appears in several games after those checks, the stick may need repair. Check Sony’s warranty before opening the controller.
To test the related hardware in your browser, use our Gamepad Tester.
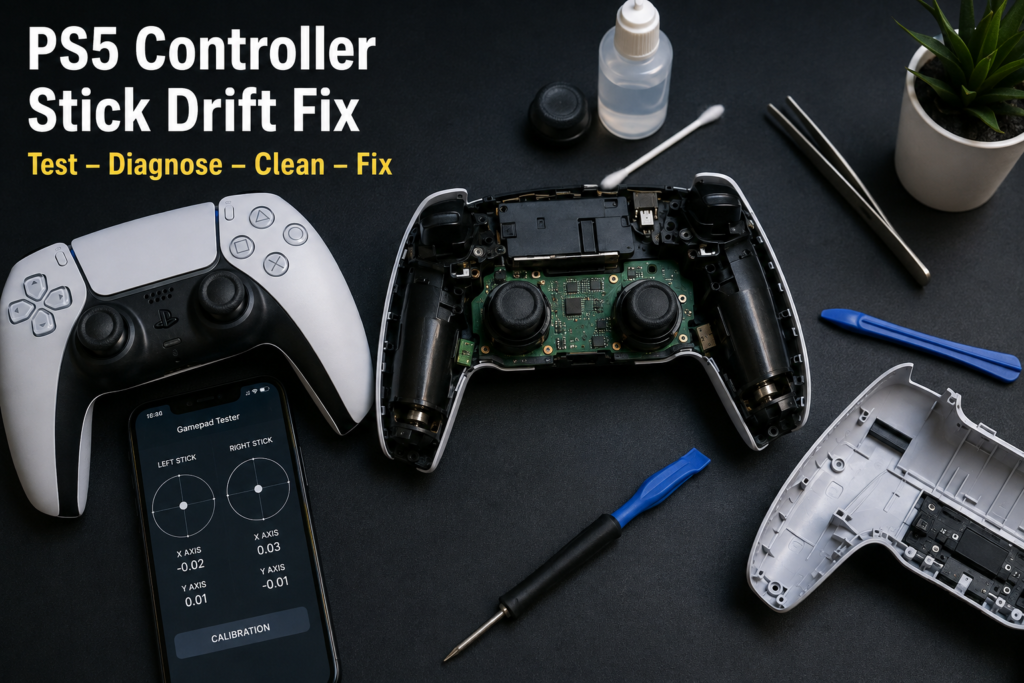
How Do I Fix PS5 Stick Drift Without Opening the Controller?
Work through these checks in order. Run the browser test again after each step.
Step 1: Check Another Game
Load a second game that uses the same analog stick.
Restore the first game’s controller settings to their defaults. Turn off any custom response curve, remapping profile, or unusually low deadzone.
When the unwanted movement appears in only one game, adjust that game rather than opening the controller.
Step 2: Update the DualSense and PS5
On the PS5, go to:
Settings > Accessories > Controller (General) > DualSense Wireless Controller Device Software
Install any available controller update. Also install current PS5 system software.
Sony also offers the PlayStation Accessories app for updating supported controllers from a Windows PC.
Test the controller again after the update.
Step 3: Reset the Controller
- Turn off the PS5.
- Disconnect the DualSense.
- Find the small reset hole on the rear of the controller.
- Use a pin or similar small tool to press the reset button.
- Connect the controller to the PS5 with a USB cable.
- Press the PS button.
- Run the browser and game tests again.
Sony’s current support page says the reset does not reconfigure the controller or remove its pairing settings.
Step 4: Clean Around the Analog Stick
Turn off and disconnect the controller.
Use a clean, dry microfiber cloth around the base of the affected stick. Rotate the stick slowly while wiping the exposed edge.
For stubborn residue, place a small amount of high-concentration isopropyl alcohol on a lint-free swab. The swab should be damp, not dripping.
Wipe around the outside of the stick base and allow it to dry fully before reconnecting the controller.
Do not use:
- WD-40
- Cooking oil
- Hand sanitizer
- Household cleaner
- A dripping cotton swab
- Liquid poured directly into the case
Step 5: Adjust the Game Deadzone
Increase the affected stick’s inner deadzone one small step at a time.
Test slow aim, walking, menus, and sprinting after each change.
A larger deadzone can hide a small center offset. It does not repair the sensor. When you need a large deadzone to keep the controller still, repair is the better long-term choice.
Step 6: Test a Third-Party Browser Calibration
A third-party WebHID calibration tool can change center and range data on supported DualShock and DualSense controllers.
This is not an official Sony repair tool. It cannot clean debris, restore a worn contact, or replace a damaged module.
The open-source Calibration GUI supports DualSense controllers through a WebHID browser such as Chrome or Edge. Its own warning says the utility cannot repair mechanical drift and that calibration without replacement may help temporarily or may make the issue worse.
Use it carefully:
- Connect through USB.
- Use a supported desktop browser.
- Record your existing readings.
- Test temporary or unsaved changes first.
- Recheck both sticks and their full range.
- Do not save a permanent change until the temporary result has been tested.
- Avoid third-party calibration when you plan to make a warranty claim unless Sony tells you to use it.
Step 7: Check the Warranty or Book a Repair
When the same movement remains in the tester and several games, contact PlayStation Support before opening the controller.
In the United States, Sony’s accessory warranty covers qualifying defects for one year from the original purchase date. Proof of purchase is required. Sony decides whether an eligible product is repaired or replaced.
For diagnosis and repair steps, see our PS5 Controller Repair guide.
Quick Start in Five Languages
English: Connect the DualSense with a USB cable, open the tester, leave both sticks untouched for five seconds, and watch whether either dot stays away from the center.
Roman Urdu: DualSense ko USB cable se connect karein, tester kholein, sticks ko paanch second na chhuyein, aur dekhein dot center se khud move to nahi karta.
Urdu: ڈوئل سینس کو یو ایس بی کیبل سے جوڑیں، ٹیسٹر کھولیں، پانچ سیکنڈ تک اسٹکس کو نہ چھیڑیں، اور دیکھیں کہ کوئی ڈاٹ خود بخود سینٹر سے ہٹ تو نہیں رہا۔
Arabic: وصّل يد DualSense بكابل USB، وافتح أداة الاختبار، ولا تلمس العصا لخمس ثوانٍ. راقب هل تتحرك النقطة بعيدًا عن المنتصف من تلقاء نفسها.
Spanish: Conecta el DualSense por USB, abre el probador, no toques los sticks durante cinco segundos y comprueba si algún punto se aleja solo del centro.
What Is Stick Drift on a DualSense?
Stick drift is unintended analog input. The controller reports movement while the stick is resting. It can affect the left stick, the right stick, or both.
The left stick usually controls walking and sprinting. Drift there can make a character move, slow down, or stutter while sprinting.
The right stick often controls the camera or aim. Drift there can make your view pull slowly to one side.
Do not assume every unwanted movement means that the stick is worn. A game can have a very small deadzone, a controller profile can be wrong, or the controller may need a firmware update or reset.
Test first so you do not pay for a repair you do not need.
How Do I Test PS5 Stick Drift Online?
Use a desktop browser that supports gamepad input. A wired USB connection is best for the first check because it removes Bluetooth from the test.
- Close any game or app that may be reading the controller.
- Connect the DualSense to the computer with a USB data cable.
- Open the PadProTools Gamepad Tester.
- Press a controller button so the browser detects it.
- Put the controller on a flat surface.
- Leave both analog sticks untouched for at least five seconds.
- Watch the left and right stick markers.
- Rotate each stick slowly through a full circle.
- Release the stick and see whether it settles near the center.
- Repeat the test through Bluetooth if you normally play wirelessly.
- Check the same controller in at least two games.
Browser gamepad axes normally use values between -1 and 1, with zero near the center. The W3C defines the normalized range, but it does not set a single Sony drift cutoff for every controller and game. Different games apply different deadzones.
A small amount of visual movement may not cause any problem in a game with a larger deadzone. A steady offset that also moves your character, camera, or menu is stronger evidence of drift.
For a closer look at center tolerance, read our Controller Deadzone guide.
What Are the Common Symptoms?
Common signs include:
- The camera slowly turns when your thumb is off the right stick.
- Your character walks or leans without input.
- Sprinting starts, stops, or stutters while the left stick is held forward.
- A menu keeps moving in one direction.
- Aim feels pulled off target in shooting games.
- One direction does not reach its full range.
- Movement changes when you press down on the stick.
- The issue appears in several games rather than one title.
A single game can still be the cause. Reset that game’s controller settings before treating the controller as faulty.
Why Does a PS5 Controller Drift?
The Game Deadzone Is Too Small
A deadzone is the area around the center that a game ignores.
A low setting gives faster response, but it can reveal tiny center movement. Raising the setting slightly may stop minor movement.
It also reduces fine control, so use the smallest setting that keeps your character or camera still.
The Controller Software Needs an Update
Sony releases device software updates for the DualSense. An update may correct software, compatibility, or connection problems.
An update cannot rebuild a worn mechanical part.
The Controller Needs a Reset
A reset can clear some controller or connection problems. It is a safe check to perform before cleaning or opening the case.
Dirt or Residue Is Affecting the Stick
Dust, skin oil, hair, or residue can collect around the stick shaft or inside the analog assembly.
Light exterior cleaning may help when contamination is causing the problem. Do not pour liquid into the controller.
The Potentiometer Is Worn
A standard DualSense analog stick uses mechanical sensing parts. Contact surfaces can wear as the stick moves.
Cleaning may help when dirt is present, but it cannot replace a worn surface.
The Controller Was Dropped or Exposed to Liquid
An impact can bend, crack, or loosen a component. Liquid may leave residue or damage the circuit board.
Stop using the controller if it becomes hot, smells unusual, or shows signs of battery swelling. Have it inspected by a repair professional.
How This Guide Was Checked
This guide uses current Sony U.S. support and warranty pages, the W3C Gamepad API specification, repair references, and the supplied repair transcript.
PadProTools does not claim that a controller was physically repaired for this article. Menu names, warranty terms, browser behavior, and tool warnings were reviewed again on August 7, 2026.
Can a Website Fix PS5 Controller Stick Drift?
A website can test the controller and display unintended input. Some third-party browser tools can also change calibration data on supported controllers.
A website cannot:
- Remove debris from inside the controller
- Restore a worn contact surface
- Repair a cracked board
- Tighten a loose component
- Replace a damaged stick module
- Repair liquid damage
Think of a tester as a measuring tool.
It helps answer three questions:
- Does the controller move while untouched?
- Is the problem on the left stick, right stick, or both?
- Did a reset, cleaning step, calibration, or repair improve the reading?
A page that promises to repair every drifting controller with one click is not explaining the full problem.
Is There an Official PS5 Stick Calibration Setting?
Sony’s current U.S. support pages do not list a general stick-calibration menu for the standard DualSense.
They provide:
- Controller software updates
- Controller reset instructions
- General controller settings
- PlayStation Repairs routing
DualSense Edge is different. Sony provides custom-profile settings that let Edge owners change stick sensitivity and deadzones.
Do not confuse an Edge profile setting or a third-party WebHID utility with an official standard DualSense calibration menu.
Does Recalibrating a DualSense Fix Drift?
Calibration can help when the stored center or range data is wrong but the mechanical parts are still working properly.
It may also be needed after a stick module has been repaired or replaced.
Calibration is less likely to help when:
- The reading jumps rather than staying at one steady offset.
- The value changes when you press the stick.
- The issue becomes worse during play.
- Movement returns soon after calibration.
- The stick does not reach its full range.
- The stick feels physically loose or rough.
Those signs point more strongly to contamination, wear, or physical damage.
Save a screenshot or note of the values before and after calibration. That gives you evidence that the change helped or failed.
Can Cleaning Fix Controller Drift?
Cleaning can help when dust or residue blocks smooth movement or affects a contact.
It will not rebuild a worn mechanical surface.
Start with exterior cleaning. Opening the controller exposes:
- Small ribbon cables
- The battery connector
- Plastic case latches
- The battery bracket
- The circuit board
- Trigger parts
- Small rubber and plastic pieces
A simple cleaning job can become a larger repair when a cable tears or a latch breaks.
Check the warranty first.
How Is the Controller Opened for Internal Cleaning?
Continue only when the controller is out of warranty and you accept the risk of damage.
Useful tools include:
- Small Phillips screwdriver
- Plastic pry tool or thin plastic pick
- Tweezers
- Lint-free swabs
- High-concentration isopropyl alcohol
- Small tray for screws
The usual path is:
- Power off and disconnect the controller.
- Lift the black middle trim with a plastic tool.
- Remove the L1 and R1 buttons carefully.
- Remove the four case screws.
- Release the clips along the rear case.
- Lift the rear case over the trigger area.
- Disconnect the battery by gripping its plug rather than pulling hard on the wires.
- Remove the battery-bracket screw and bracket.
- Release the required ribbon cables and board clips.
- Lift the board while guiding the analog sticks through the front shell.
- Remove the cap from the affected stick.
- Identify the side sensor connected to the direction causing trouble.
- Open the sensor housing only as far as needed.
- Remove the small contact piece with tweezers and note its exact direction.
- Clean the part and housing with a damp swab.
- Let all parts dry fully.
- Reinstall the contact in the same direction.
- Close the housing until it sits correctly.
- Reassemble the board, cables, bracket, battery, case, buttons, and trim.
- Make sure no ribbon cable is caught beneath the board.
- Test every button, trigger, stick, touchpad click, USB connection, and wireless connection.
Use a detailed visual guide while working. The iFixit DualSense stick-drift page links to part-level repair instructions.
Internal cleaning is not the same as analog-stick replacement.
Replacing a standard DualSense stick module normally requires desoldering and soldering several board connections. Use a trained technician unless you already have board-repair experience.
For a part-focused walkthrough, see our DualSense Analog Stick Replacement guide.
How Much Does PS5 Controller Stick Drift Repair Cost?
Sony does not publish one fixed U.S. price for every out-of-warranty controller fault.
The final amount can depend on:
- The damaged part
- Local labor rates
- Shipping
- Whether one or both sticks are replaced
- Calibration
- Standard replacement parts
- Hall-effect or TMR modules
- The repair warranty
As of August 7, 2026, one U.S. mail-in service lists standard DualSense stick-drift repair at $49.99. That example includes replacement of both joysticks, calibration, and testing, but prices and availability can change.
Local chains often inspect the controller and provide a quote rather than publishing one fixed price.
Before paying, compare:
- The full repair quote
- Inbound and return shipping
- The shop’s repair warranty
- The current price of a replacement controller
- Whether both sticks will be checked
- Whether calibration is included
- Whether every button and trigger will be tested
- The type of replacement module
A low quote is not useful if the controller is returned without proper calibration or full input testing.
Is Stick Drift Covered by the PS5 Controller Warranty?
It may be covered when the fault qualifies as a defect under Sony’s U.S. accessory warranty.
The current warranty covers qualifying defects in materials or workmanship for one year from the original purchase date. It applies to the original purchaser and requires proof of purchase. Sony may repair the controller or replace it with a new or factory-recertified product.
Damage related to misuse, accidents, neglect, or excluded causes may not be covered.
Start with PlayStation Repairs before opening or modifying the controller.
Keep:
- The receipt
- The serial and model details
- A short video showing the unwanted movement
- Your browser-test screenshot
- A short note listing the games affected
- The date when the problem began
Sony decides which evidence it needs and whether the claim qualifies.
Can I Return a Drifting PS5 Controller?
A retailer return and a Sony warranty claim are different.
Use the retailer’s return process when the controller is still inside that store’s return window.
Use Sony’s repair process when the store window has ended but the controller may still be covered by Sony’s warranty.
Return periods differ by store, membership level, product condition, and purchase method. Check the exact terms on your receipt or order page.
Give the correct purchase date and describe the problem accurately.
What Is Different About DualSense Edge Drift?
DualSense Edge can still develop unwanted stick input, but it gives the owner more official options.
Sony lets Edge owners:
- Create custom controller profiles
- Adjust stick sensitivity
- Adjust stick deadzones
- Replace the left or right stick module
- Use either module on either side
Sony’s current instructions place these settings under:
Settings > Accessories > DualSense Edge Wireless Controller > Custom Profiles > Stick Sensitivity/Deadzone
A faulty Edge stick module can also be removed through the front cover and replaced without soldering.
Before buying a module:
- Switch to the default profile.
- Reset custom deadzone settings.
- Update the controller.
- Test the affected stick online.
- Swap the module to the other side when practical.
- Check whether the problem follows the module.
When the problem follows the module, that is stronger evidence that the module is faulty.
Should I Repair or Replace the Controller?
| Situation | Best First Move |
|---|---|
| Bought less than one year ago with proof of purchase | Contact Sony before opening it |
| Movement appears in only one game | Reset that game and adjust its deadzone |
| Small, steady offset with normal full range | Try reset, cleaning, and cautious testing |
| Drift appears in several games after update and reset | Request a repair quote |
| Reading jumps when the stick is pressed | Ask a technician to inspect the assembly |
| Controller has liquid or impact damage | Seek professional inspection |
| Controller becomes hot or battery swells | Stop using it immediately |
| DualSense Edge profile causes movement | Reset the profile and deadzone |
| Edge problem follows the removable module | Replace the module |
| Repair price is close to a new controller’s current price | Replacement may make more sense |
| Controller has several other faults | Compare total repair cost with replacement |
For a shorter troubleshooting path, see our PS5 Controller Drift Fix guide.
How Do I Verify That the Repair Worked?
Do not rely on one quick game.
- Run the same browser test used before the repair.
- Leave both sticks untouched for at least five seconds.
- Check whether each marker settles near the center.
- Move each stick through a slow full circle.
- Check whether every direction reaches its normal range.
- Press every button and trigger.
- Test the touchpad click.
- Test through USB.
- Test through Bluetooth.
- Play two games with different deadzone settings.
- Check slow aim, menus, walking, and sprinting.
- Repeat the test after 20 to 30 minutes of play.
Save the before-and-after readings.
When the movement returns quickly, contact the repair shop while its service warranty is still active.
How Can I Reduce the Chance of Drift Returning?
You cannot prevent all mechanical wear, but basic care helps:
- Store the controller in a clean and dry place.
- Keep food and drinks away from the sticks.
- Keep hand lotion and oily residue away from the controller.
- Do not press the sticks harder than the game requires.
- Avoid drops.
- Do not place heavy items on the controller.
- Clean around the sticks before residue builds up.
- Install controller device-software updates.
- Test the controller after a spill or hard impact.
- Do not keep raising the deadzone without measuring the change.
FAQs
Can Stick Drift Go Away on Its Own?
It may appear to disappear when debris moves or a game uses a larger deadzone. Worn hardware does not repair itself. Run the test again before assuming the fault is gone.
Can a PS5 Controller Drift Only in One Game?
Yes. Games use different deadzones, response curves, and controller settings. Reset the affected game and compare it with another title.
Can Stick Drift Affect Sprinting?
Yes. Left-stick input that drops, jumps, or fails to reach its full forward range can make sprinting stop, start, or stutter.
Is Compressed Air Safe for a DualSense?
A short and controlled burst around the outside may move loose dust. Strong pressure can push dirt farther inside or move delicate parts. Start with a dry cloth and careful exterior cleaning.
Can I Use Rubbing Alcohol on the Analog Stick?
Use only a small amount of high-concentration isopropyl alcohol on a lint-free swab. Keep the controller off and disconnected. Do not pour liquid inside, and let the area dry fully.
Does a Bigger Deadzone Fix Stick Drift?
It can hide a small center offset. It does not repair a worn or dirty sensor. A large deadzone can also make fine aim less precise.
Is There an Official DualSense Calibration App?
Sony provides controller updates and support tools, but its current U.S. support pages do not list general analog-stick calibration for the standard DualSense.
Third-party WebHID tools exist. They should be used carefully and must not be presented as official Sony tools.
Does DualSense Edge Get Stick Drift?
It can. DualSense Edge lets you adjust sensitivity and deadzones through custom profiles, and its stick modules are replaceable.
Does Replacing One Stick Require Calibration?
A replacement may require center and range calibration, especially after board-level work. Ask the repairer whether calibration and full input testing are included.
Will Sony Repair a Controller Without a Receipt?
Sony’s U.S. accessory warranty says proof of purchase is required. Contact PlayStation Support about your case rather than assuming it will be accepted.
Sources Checked
- Sony DualSense Controller Support
- Sony Controller and DualSense Edge Support
- Sony U.S. Accessory Warranty
- W3C Gamepad API Specification
- DualShock Calibration GUI
- iFixit DualSense Stick Drift Troubleshooting

One Comment