PS5 DualSense Analog Stick Replacement (Step-by-Step)
If your PS5 controller starts moving on its own, struggles to register accurate movement, or develops stick drift during gameplay, PS5 DualSense Analog Stick Replacementmay be the most reliable long-term solution. While some cases can be improved with cleaning or calibration, worn potentiometers and damaged joystick modules usually require hardware replacement. In this guide, you’ll learn how to identify the real cause, choose the right repair method for your controller, replace the analog stick safely on both the standard DualSense and the DualSense Edge, calibrate it correctly, and verify the repair before jumping back into your favorite games.
Key Takeaways
- Replace the analog stick only after confirming that stick drift isn’t caused by dirt, firmware, or calibration.
- Standard PS5 DualSense controllers require soldered hardware repair, while DualSense Edge controllers use tool-free, swappable stick modules.
- Replacing only the faulty potentiometer may solve drift if the joystick mechanism is still in good condition.
- Hall Effect and TMR replacement modules can provide longer service life than traditional potentiometer-based sticks.
- Always calibrate and test the controller after completing the repair.
- Using the correct replacement parts is just as important as the repair itself.
Who Should Read This Guide?
This guide is for:
- PS5 owners are experiencing stick drift or inaccurate movement.
- DIY beginners who want to repair their own controller.
- Electronics hobbyists replacing joystick modules.
- Console test online repair technicians.
- DualSense Edge owners who want the official tool-free module swap, not a soldering guide.
- Anyone comparing repair costs with buying a new controller.
- Players who want to verify their repair using an online Gamepad Tester.
What Causes PS5 DualSense Stick Drift?
Stick drift happens when the controller detects movement even though the analog stick is sitting at its center position. In many cases, the character moves slowly across the screen, the camera rotates by itself, or aiming becomes difficult.
Although many players immediately assume the joystick has failed, that’s not always the case. Dirt, worn components, calibration errors, and physical damage can all produce similar symptoms. Understanding the cause before opening the controller can save both time and money.
Worn Potentiometers vs. Dirt and Dust
Most standard DualSense controllers use potentiometer-based analog sticks. Every time you move the stick, tiny contact surfaces inside the potentiometer slide across a resistive track to measure its position. Over hundreds or even thousands of hours, those contact surfaces gradually wear down. When the wear becomes uneven, the controller starts receiving inaccurate position data, one of the most common causes of permanent stick drift.
Dust and debris can create similar symptoms. Small particles may enter the joystick housing and interfere with the electrical contacts. In these situations, carefully cleaning the joystick may improve performance without replacing any parts.
Mechanical Wear vs. Software Problems
Not every drifting controller has a damaged joystick. Other possible causes include:
- Outdated controller firmware.
- Incorrect calibration values.
- Damaged thumbstick caps.
- Loose internal connections.
- Physical impact after dropping the controller.
- Manufacturing defects.
Because several problems produce nearly identical symptoms, testing the controller before replacing parts is always the smarter approach.
When Stick Drift Becomes a Hardware Problem
If the controller continues drifting after updating the firmware, cleaning around the joystick, recalibrating the analog stick, and testing on another device, the analog stick module itself is usually the most likely source of the problem. At that point, replacing either the potentiometer or the complete joystick module becomes the most effective repair.
Diagnose the Problem Before Replacing Anything
One mistake many people make is ordering replacement parts before confirming the actual fault. A controller that drifts during gameplay doesn’t always have a failed analog stick. Spending a few minutes testing the controller first helps you avoid unnecessary repairs and ensures you’re fixing the right problem.
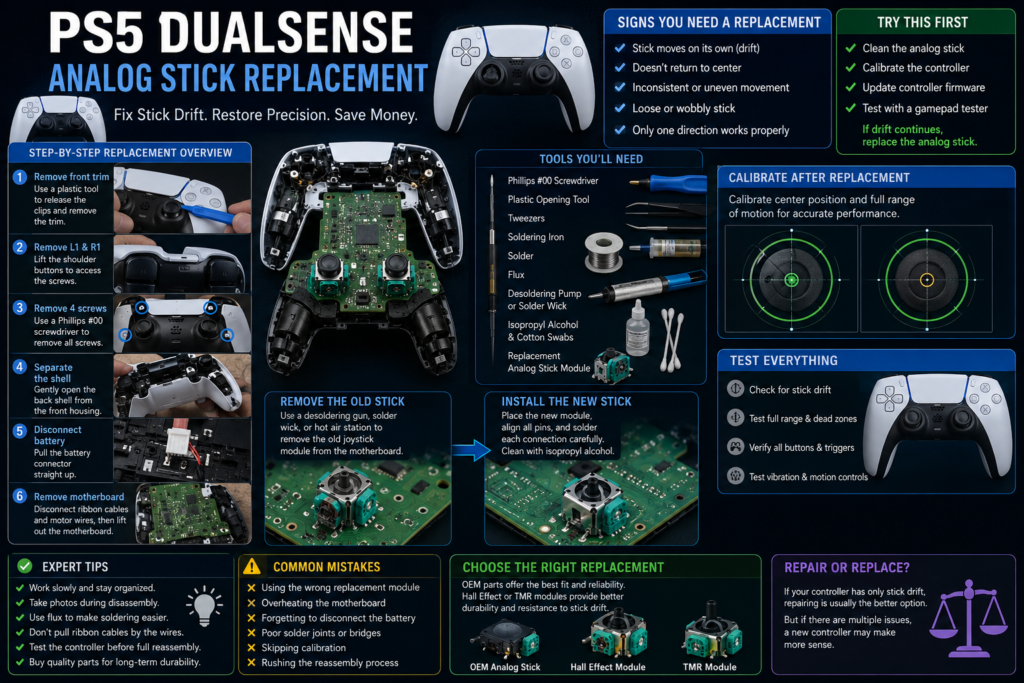
Signs Your Analog Stick May Need Replacement
- The character walks without touching the stick.
- The camera slowly moves by itself.
- The crosshair won’t stay centered.
- Movement suddenly jumps in one direction.
- The stick doesn’t return smoothly to the center.
- Movement feels rough or catches while rotating.
- Clicking the analog stick feels inconsistent.
- Calibration doesn’t eliminate the drift.
The more of these symptoms you notice, the more likely the joystick hardware is wearing out.
Test for Stick Drift Before Opening the Controller
Before picking up a screwdriver, verify the problem with a controller test. A proper analog stick test lets you check center position, X-axis movement, Y-axis movement, full movement range, circular tracking, dead zones, input jitter, and button response. If the analog stick continues sending input while untouched, you’ve confirmed the problem isn’t just happening inside a game.
Check the Analog Stick’s Full Range of Motion
Move the stick slowly in every direction. A healthy joystick should move smoothly, return naturally to center, reach full movement in every direction, and produce consistent circular movement. Uneven movement, flat spots, or missing travel usually indicate wear inside the joystick module.
Verify the Center Position
After releasing the analog stick, it should settle close to its center position without noticeable movement. If the position constantly shifts even while untouched, the controller may be compensating for worn potentiometers or incorrect calibration values. Testing the center point before disassembly gives you a useful comparison after the repair is complete.
Should You Calibrate or Replace the Analog Stick?
Finding stick drift doesn’t automatically mean you need to replace the analog stick. In many cases, a simple calibration or cleaning is enough to restore normal performance. The table below compares the most common repair methods and when each one makes sense.
| Repair Method | Best For | Skill Level | Average Cost | Long-Term Fix |
|---|---|---|---|---|
| Clean the analog stick | Dust, debris, sticky movement | Beginner | Low | Sometimes |
| Recalibrate the controller | Incorrect center position or range | Beginner | Free | Sometimes |
| Replace the potentiometer | Stick drift caused by worn sensors | Intermediate | Low | Yes |
| Replace the entire analog stick module (standard) | Severe wear or physical damage | Advanced | Moderate | Yes |
| Swap the stick module (Edge) | Any drift or wear, tool-free | Beginner | Moderate | Yes |
| Upgrade to a Hall Effect or TMR module | Long-term durability and drift resistance | Advanced | Moderate to High | Yes |
When Calibration Is the Right Choice
Calibration is worth trying if the controller recently started drifting, the drift appeared after a firmware update, the stick only drifts slightly, the controller hasn’t been dropped, and the analog stick still feels smooth and returns to center naturally. Calibration cannot repair worn electrical contacts or damaged joystick components. If drift continues afterward, the problem is probably inside the analog stick itself.
When Cleaning Is Enough
Cleaning is often worth trying when the stick feels stiff or rough, movement occasionally sticks, the controller has been used in dusty environments, or drift appears only once in a while. Use compressed air or a small amount of isopropyl alcohol on a cotton swab. Avoid soaking the joystick or spraying liquids directly into the controller.
When Replacing the Potentiometer Makes Sense (Standard Controller)
A potentiometer replacement can be a good option if the joystick moves smoothly, clicking the stick still works normally, only one axis is drifting, and you already have soldering experience. Replacing only the faulty potentiometer usually costs less than replacing the complete joystick module, but it still requires careful soldering.
When You Should Replace the Entire Analog Stick Module
A complete joystick replacement is the better option when the joystick feels loose, the stick no longer centers properly, clicking is inconsistent, the housing is physically damaged, or multiple parts inside the module show signs of wear.
Choosing the Right Replacement Analog Stick
Not every replacement joystick offers the same quality. Before ordering replacement parts, check controller compatibility, manufacturer reputation, potentiometer value, sensor type, customer reviews from repair communities, and whether the module is intended for a standard DualSense or a DualSense Edge controller. Buying the cheapest replacement often leads to repeating the repair sooner than expected.
OEM vs. Aftermarket Replacement Modules
Original equipment replacement modules are designed to match the controller’s factory specifications. Quality aftermarket modules can also perform well, but cheaper alternatives sometimes differ in sensor quality, dead zone behavior, or manufacturing tolerances. Whenever possible, choose replacement parts that clearly state compatibility with your controller revision.
Hall Effect vs. Traditional Potentiometers
Standard DualSense controllers use potentiometer-based analog sticks. Hall Effect replacements measure movement using magnetic sensors instead of physical contact, offering less mechanical wear, better long-term durability, a reduced chance of future drift, and more consistent readings over time. The downside is that Hall Effect upgrades may cost more and sometimes require additional calibration after installation.
What About TMR Analog Sticks?
TMR, or Tunnel Magnetoresistance, is a newer sensor technology beginning to appear in replacement joystick modules. Like Hall Effect sensors, TMR designs reduce physical contact between moving parts, while offering excellent sensitivity and power efficiency. Availability is still limited compared to traditional potentiometer and Hall Effect replacements.
DualSense vs. DualSense Edge Analog Stick Replacement Key Differences
The two controllers solve the same problem in completely different ways. Knowing which one you own determines your entire repair path.
| Standard DualSense | DualSense Edge | |
|---|---|---|
| Stick module design | Soldered directly to the motherboard | Tool-free, swappable module |
| Tools required | Soldering iron, flux, desoldering pump/wick | No hands only |
| Skill level | Intermediate to advanced | Beginner |
| Average repair time | 45–180 minutes | 2–5 minutes per stick |
| Warranty impact | Voids warranty (opens sealed shell) | Officially supported by Sony |
| Replacement part cost | Lower (potentiometer or full module) | Higher (proprietary module) |
| Upgrade path | Hall Effect/TMR aftermarket modules available | Limited to Sony-compatible modules |
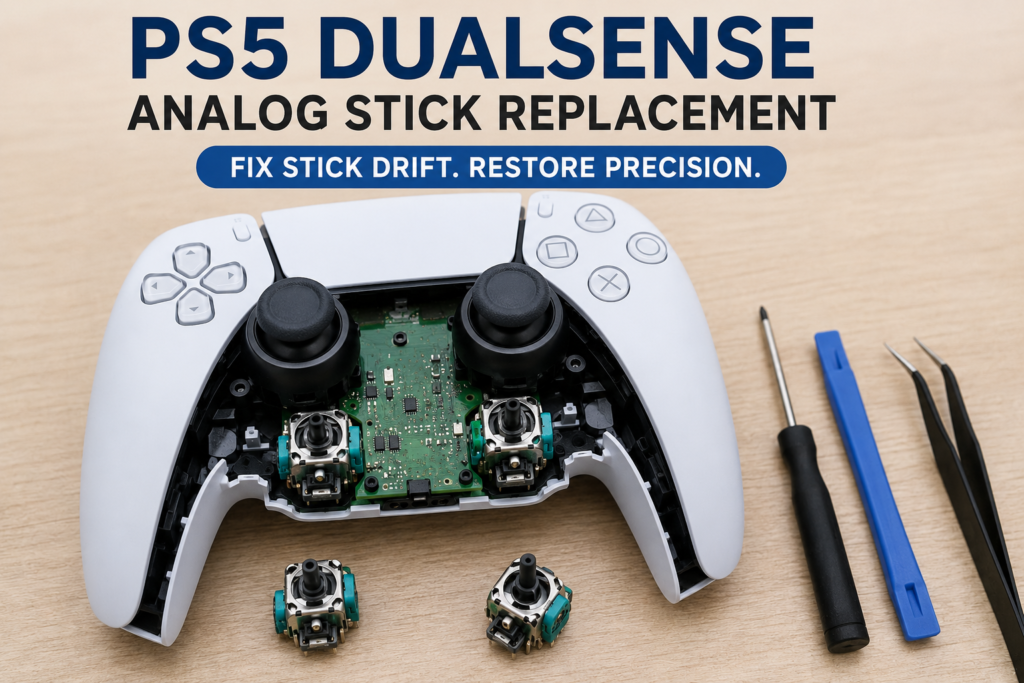
PS5 DualSense Analog Stick Replacement (Standard Controller)
Replacing the analog stick on a standard DualSense controller requires opening the controller and removing the main board. Unlike the DualSense Edge, the joystick module is permanently soldered to the motherboard, so replacing it requires electronics repair tools and careful handling. Most mistakes happen because someone forces plastic clips, pulls ribbon cables incorrectly, or applies too much heat during desoldering. Working slowly is often the difference between a successful repair and a damaged board.
Before You Begin
Prepare a clean, well-lit workspace with enough room to organize small screws and components. Take a few photos during disassembly to make reassembly easier, especially when reconnecting ribbon cables and battery wires. If possible, discharge static electricity before handling the motherboard.
Tools You’ll Need
- Phillips #00 screwdriver
- Plastic opening tool or spudger
- Tweezers
- Soldering iron
- Solder
- Flux
- Desoldering pump or solder wick
- Isopropyl alcohol
- Cotton swabs
- Replacement analog stick module or potentiometer
Some repair technicians also prefer a hot-air rework station or a vacuum desoldering gun, since these make removing lead-free solder much easier.
Safety Tips Before Opening the Controller
Turn off the controller completely, disconnect any USB cable, work on a static-safe surface, keep screws organized by location, never pull ribbon cables by the flexible section, and handle the motherboard only by its edges whenever possible.
Step-by-Step: Standard DualSense Disassembly
- Step 1: Power Off the Controller: Turn the controller off completely, disconnect the USB-C cable, and remove any connected accessories. If recently used, let it cool down before starting.
- Step 2: Remove the Front Trim: Use a plastic opening tool rather than a metal one to remove the black trim around the handles. Begin near the grips and work around the edges gently until the trim releases.
- Step 3: Remove the L1 and R1 buttons: Lift each side carefully until they pop free, exposing two of the controller’s screws.
- Step 4: Remove the Four Screws: Remove the screws beneath the L1 and R1 buttons and one inside each handle. Store them somewhere safe.
- Step 5: Separate the Rear Shell: Gently separate the back shell from the front housing, working around the edges; the clips near the trigger area usually hold the tightest.
- Step 6: Disconnect the Battery: Grip the plastic connector and lift it evenly upward; never pull on the wires.
- Step 7: Remove the Battery Tray: Remove the single retaining screw and lift the tray. Take a photo first, since some revisions have slightly different layouts.
- Step 8: Disconnect the Ribbon Cables: Disconnect the touchpad, trigger, microphone, and battery tray ribbon cables by pulling the reinforced plastic tab, never the flexible cable itself.
- Step 9: Disconnect the Haptic Motor Wires: Desolder the vibration motor wires carefully if removing the motherboard completely. Fresh solder and flux make removing the original lead-free solder easier.
- Step 10: Remove the Motherboard: Release the small retaining clips while lifting the board. If the analog sticks catch on the front shell, tilt the board rather than forcing it.
Removing the Old Analog Stick Module
With the motherboard exposed, you can access the analog stick module. This is the most technical part of the repair, since Sony uses lead-free solder, which melts at a higher temperature than traditional leaded solder.
- A vacuum desoldering gun is the fastest, cleanest option: heat each joint, then vacuum away the solder.
- Solder wick and desoldering pump: apply flux, add fresh solder, heat, then remove with the pump and clean with wick. Slower but effective.
- Hot-air rework station heats all pins simultaneously; adding leaded solder first lowers the melting point. Avoid overheating nearby plastic.
- Piece-by-piece removal: remove the potentiometers, frame, and support posts individually. Slower, but reduces stress on the board, often safer for beginners.
Installing the New Analog Stick
Inspect every pin on the replacement module for bends before inserting. Solder one mounting post first, confirm the joystick sits flat, then solder the remaining frame posts, followed by every signal pin. Inspect each joint for a smooth, shiny connection with no bridges, then clean away flux with isopropyl alcohol.
Reassemble the Controller
Reassembly follows the reverse order: confirm every ribbon cable is fully seated, reconnect the haptic motor wires in their original positions, secure the battery tray and battery, check no wires are trapped under the cover, and confirm all buttons move freely before closing the shell. Reinstall the rear shell, tighten the four screws evenly, and snap the trim and shoulder buttons back into place.
Don’t jump straight into a game yet; the controller may power on normally without the new stick being properly calibrated. Testing comes next.
PS5 DualSense Edge Analog Stick Replacement (Tool-Free Module Swap)
The DualSense Edge was designed specifically to avoid the soldering process above. Sony built it with swappable stick modules that snap in and out by hand, which is the single biggest practical difference between the two controllers and the reason Edge owners should never need to open the shell just to fix drift.
What You’ll Need
- A replacement DualSense Edge stick module (genuine Sony or a verified compatible aftermarket module)
- Nothing else, no screwdriver, no soldering iron, no opening tool
Step-by-Step: Edge Module Replacement
Step 1: Power Off and Position the Controller. Turn the controller off and place it face-down on a clean, flat surface.
Step 2: Locate the Module Release Point. On the back of the controller, find the small stick-module release switch/latch next to the stick you’re replacing. The Edge is designed so that it is accessible without removing any casing.
Step 3: Release the Module. Press or slide the release latch as indicated, then gently pull the stick module straight out. It should come free with light, even pressure never force it at an angle, since this can bend the internal connector pins.
Step 4: Insert the Replacement Module. Align the new module with the housing and press it firmly and evenly into place until it clicks and sits flush with the surrounding shell.
Step 5: Confirm the Latch Is Secure. Check that the release latch has returned to its closed position and the module doesn’t wiggle or sit proud of the housing.
Step 6: Power On and Test. Reconnect or power on the controller and move straight to calibration and testing before returning to a game.
Because there’s no disassembly involved, this repair typically takes two to five minutes per stick, dramatically faster than the standard controller’s soldered process, and it doesn’t void Sony’s support for the controller the way opening a sealed standard DualSense shell does.
How to Calibrate and Test Your Controller After Replacement
Regardless of which controller you repaired, calibration and testing are not optional steps.
- Open your PS5’s built-in controller calibration settings and follow the on-screen prompts to set the new stick’s center point and range.
- Run a full analog stick test, checking center position, X-axis movement, Y-axis movement, circular movement, dead zones, button response, trigger response, and L3/R3 clicks.
- Play a short session in a game with precise aiming or movement to confirm the fix feels correct in real conditions, not just in a diagnostic tool.
A complete test helps confirm the repair was successful before you return to regular use.
FAQS
Can You Replace a PS5 DualSense Analog Stick Yourself?
Yes. With basic electronics repair skills and the right tools, you can replace a PS5 DualSense analog stick at home. The repair requires opening the controller, removing the motherboard, desoldering the old joystick module, installing a compatible replacement, calibrating the new stick, and testing before regular use.
Do You Need to Solder a PS5 DualSense Analog Stick?
For a standard DualSense controller, yes, the module is soldered directly to the motherboard. DualSense Edge controllers use removable stick modules and require no soldering at all.
Can You Replace Only the Potentiometer Instead of the Entire Analog Stick?
Yes. If the joystick mechanism and L3/R3 buttons still work normally, replacing only the worn potentiometer can fix drift for less than a full module replacement, though it still requires careful soldering.
Will Replacing the Analog Stick Fix Stick Drift?
Usually, yes, if the drift is caused by worn potentiometers or a damaged module. If the cause is dirt, calibration, or software, replacement may not be necessary.
Can Stick Drift Be Fixed Without Replacing the Analog Stick?
Sometimes. Start by cleaning around the joystick, updating firmware, recalibrating, and testing. If those don’t help, the internal components have likely worn out.
How Long Does It Take to Replace a PS5 Analog Stick?
A standard controller repair takes an experienced technician about 45–90 minutes and up to two to three hours for a first attempt. A DualSense Edge module swap takes about two to five minutes with no tools required.
How Much Does a PS5 DualSense Analog Stick Replacement Cost?
Cost depends on the replacement part and tools you already own. DIY replacement is usually far cheaper than buying a new controller; repair shop labor adds to the total.
Is It Worth Repairing a PS5 Controller?
In most cases, yes, if only the stick is worn and everything else works, replacement is generally more economical than replacing the whole controller.
Can You Replace Both Analog Sticks at the Same Time?
Yes. Many technicians replace both modules together, especially on heavily used controllers, to reduce the chance of a second repair soon after.
Can You Replace a PS5 Controller Thumbstick Grip?
Yes. If only the rubber cap is worn, you can replace just the thumbstick cap without touching the internal module, no soldering required.
Can You Use a DualSense Edge Stick Module in a Standard DualSense Controller?
No. Edge stick modules are not compatible with the standard controller, which uses a permanently soldered module instead.
Are Hall Effect Analog Sticks Better Than Stock Joysticks?
Hall Effect sticks use magnetic sensors instead of physical contact, reducing mechanical wear and lowering the chance of future drift. Availability and compatibility vary by controller revision.
How Do You Test a PS5 Controller After Replacing the Analog Stick?
Verify center position, X/Y-axis movement, circular movement, dead zones, button response, trigger response, and L3/R3 clicks before returning to regular use.
Expert Tips Before You Start
- Take photos during each stage of disassembly so every cable and screw returns to its original position.
- Label screws if your workspace is small; some are different lengths despite looking similar.
- Use plenty of flux when working with Sony’s lead-free solder to make desoldering easier.
- Never pull ribbon cables by the flexible section; always grip the reinforced tab.
- Inspect every solder joint under good lighting before reinstalling the motherboard.
- Clean away excess flux after soldering for easier inspection.
- Test the controller before fully reassembling the shell whenever possible.
- Buy replacement parts from reputable suppliers that clearly state compatibility with your controller model and revision.
- Edge owners: always power off before releasing a stick module, and never force it out at an angle.
Related Guides
- PS5 Controller Stick Drift Test
- How to Calibrate a PS5 Controller
- PS5 Controller Deadzone Explained
- Hall Effect vs. TMR Analog Sticks
- PS5 Controller Buttons Not Working
- PS5 Controller Not Connecting
- Controller Calibration Guide
- Controller Deadzone Tester
- Online Gamepad Tester
- How to Fix PS5 Trigger Problems
Final Verdict
A PS5 DualSense analog stick replacement can give your controller a second life when cleaning and calibration are no longer enough. Standard DualSense owners are looking at a soldered repair that rewards patience and the right tools, while DualSense Edge owners have it easier. Sony built the Edge specifically so a worn stick is a tool-free, few-minute swap rather than a repair project.
Before opening anything, confirm the analog stick is actually causing the problem. If it is, replacing it with a quality compatible part potentiometer, standard module, Edge module, or a Hall Effect/TMR upgrade and calibrating and testing it afterward will usually restore smooth, accurate control for a fraction of the cost of a new controller.