By PadProTools Editorial Team
Last reviewed: July 28, 2026
Connect your controller tester and check whether both analog sticks return to the center, move smoothly, and reach their full range. This gamepad tester calibration tool helps you spot center offset, unstable input, limited movement, and possible stick drift before you change any settings or open the controller.
The browser test measures controller input. It does not permanently recalibrate every gamepad. Actual calibration may need Windows, Steam, console settings, manufacturer software, or a supported controller-specific tool.
Gamepad Tester and Calibration Dashboard
Gamepad Calibration Tester
Check stick center, movement range, stability, and before-and-after results.
Test your controller calibration
Connect a controller with USB or Bluetooth, then press any button. You can open the tester before connecting.
Left Stick
WaitingRight Stick
WaitingBefore and After Comparison
| Measurement | Baseline | Current | Result |
|---|
Before You Start
- Connect the controller through USB or Bluetooth.
- Press any button so the browser can detect it.
- Place the controller on a flat surface.
- Keep your thumbs off both sticks.
- Close any game that may be using the controller.
- Start the resting-position test.
For the cleanest first test, use a data-capable USB cable when possible. You can compare the USB result with Bluetooth later.
What the Tester Should Display
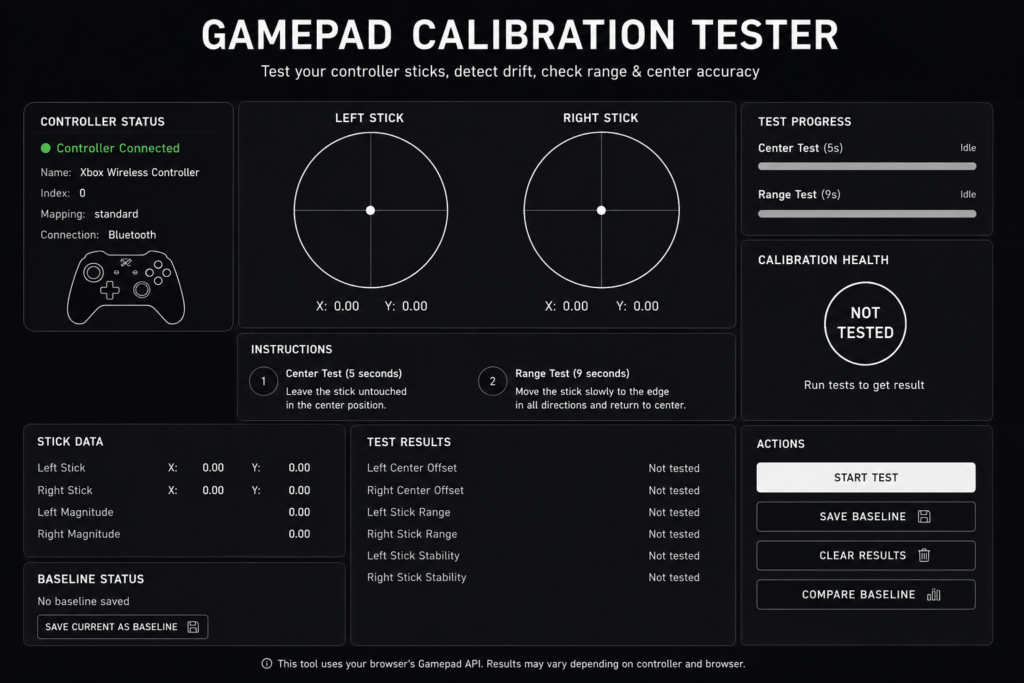
The calibration dashboard should show:
- Connected controller name
- Connection status
- Number of detected buttons and axes
- Left-stick X and Y readings
- Right-stick X and Y readings
- Live stick position
- Resting center offset
- Maximum movement while untouched
- Full movement range
- Input stability
- Suggested next step
The browser Gamepad API exposes controller information such as the device ID, button states, analog axes, connection state, and mapping. Analog-axis values are normally reported on a scale from -1.0 to 1.0, while analog button values such as triggers may be reported from 0.0 to 1.0.
Start the Calibration Test
Leave both sticks untouched for a few seconds.
Watch where the two markers settle. They do not need to display a perfect zero at every moment, but they should remain close to the middle without large jumps.
Next, move the left stick slowly around its full physical edge. Release it and let it return naturally. Repeat the same movement with the right stick.
Do not push harder than normal. The test should measure the controller’s usable movement, not how much force you can apply to the plastic parts.
Calibration Health Result
The tool should return one clear result for each stick:
- Centered: The stick rests close to the middle and remains stable.
- Small stable offset: The resting point is slightly off-center but does not wander.
- Calibration may help: The stick repeatedly returns to the same incorrect center.
- Deadzone adjustment may help: The resting movement is small and otherwise stable.
- Unstable input: The reading shakes, jumps, or moves unpredictably.
- Range problem: One or more directions do not reach the expected outer range.
- Possible hardware wear: The movement is erratic or remains faulty after calibration.
- Retest needed: The reading was affected by touch, movement, or a connection problem.
What Is Gamepad Calibration?
Gamepad calibration corrects how a controller’s center point and movement range are interpreted.
A calibrated stick should:
- Return close to its neutral position when released
- Move smoothly through every direction
- Reach a useful outer range
- Avoid reaching full input too early
- Produce similar movement in matching directions
- Remain reasonably stable while untouched
Calibration is not the same as testing. A tester reads what the controller is reporting. A calibration process may change the stored center, range, or software interpretation of that input.
Test Your Controller Before Calibrating It
Do not start changing settings as soon as the character moves by itself.
First, record what the controller is doing. This gives you a baseline and helps you choose the right fix.
Check the Resting Center
Place the controller down and leave both sticks alone.
Watch each marker for several seconds.
A marker that stays slightly to one side is different from one that keeps moving. The first may be a stable center offset. The second may point to dirt, sensor noise, worn parts, a loose module, or another hardware problem.
A repair transcript supplied for this page showed a replacement Hall Effect module returning to the same off-center point after release. The controller was tested again after center and range calibration to compare the result.
Check for Unwanted Movement
Look for:
- Slow movement away from the center
- Constant pulling in one direction
- Shaking around the middle
- Sudden jumps
- A reading that changes without touching the stick
- Different behavior each time the stick is released
A steady offset and random jumping should not be treated as the same fault.
A steady offset may respond to calibration. Large random jumps are less likely to be corrected by changing the center point.
Check the Full Movement Range
Move one stick slowly:
- Fully left
- Fully right
- Fully upward
- Fully downward
- Around the complete outer edge
Repeat the test with the other stick.
Check whether one direction stops short. Also watch for a direction that reaches maximum input much earlier than the others.
Check the Return to Center
Move the stick in several directions and release it from each one.
A healthy result should be reasonably consistent. The marker may settle a little differently each time, but it should not land far apart after every release.
Save the Baseline
Before changing anything, record:
| Measurement | Left Stick | Right Stick |
|---|---|---|
| Resting center offset | ||
| Maximum untouched movement | ||
| Input stability | ||
| Left range | ||
| Right range | ||
| Up range | ||
| Down range | ||
| Circular movement | ||
| Suggested deadzone |
Run the same test after calibration. Without a baseline, it is difficult to tell whether the controller improved or simply changed.
How to Use the Gamepad Tester Calibration Tool
Step 1: Connect the Controller
Connect the gamepad through:
- A USB data cable
- Bluetooth
- An official wireless adapter
- A supported third-party receiver
Press a face button after connecting it. A browser may not expose an already connected controller to the page until the user presses a button or moves an axis.
Step 2: Keep Both Sticks Untouched
Set the controller down.
Do not rest your thumbs on the sticks. Even light pressure can change the reading enough to affect the resting sample.
Step 3: Run the Center Test
Start the resting-position sample and wait for it to finish.
The tool should measure:
- Average X position
- Average Y position
- Distance from the center
- Maximum movement during the sample
- How much the reading changes over time
Step 4: Test the Stick Range
Move both sticks slowly around their full outer edges.
Fast circles may miss sections of the range. Two or three slow rotations in each direction usually provide a clearer movement trace.
Step 5: Review the Reading
Check whether the problem is:
- A stable center offset
- Unstable movement
- Missing outer range
- Uneven directional range
- A small amount of movement that can be handled by a deadzone
- A game-specific setting rather than a controller fault
Step 6: Choose the Right Calibration Method
Use the result to choose between:
- Windows calibration
- Xbox Accessories
- Steam Input
- Nintendo system calibration
- Supported PlayStation controller tools
- Manufacturer software
- An in-game deadzone setting
- Cleaning or hardware repair
Step 7: Retest
Use the same:
- Browser
- Cable or wireless connection
- USB port
- Test duration
- Stick movement pattern
- Controller settings
Changing several conditions at once makes the before-and-after comparison less useful.
How to Read Your Calibration Results
Center Offset
Center offset is the distance between the stick’s reported resting position and the middle of the test area.
For X and Y values, the distance can be calculated as:
Center offset = √(X² + Y²)
A higher result means the resting position is farther from the center.
Do not use one universal number as a pass-or-fail rule. Different controllers, games, operating systems, and input layers may handle small values differently.
Stable Offset
A stable offset means the stick repeatedly settles in almost the same off-center position.
Possible causes include:
- Stored calibration values
- Slight physical misalignment
- A replacement joystick module
- Normal manufacturing tolerance
- Minor wear
- A game deadzone that is set too low
Calibration has a better chance of helping when the offset is smooth and repeatable.
Wandering Input
Wandering input means the marker continues moving while the controller is untouched.
Possible causes include:
- Dirt or contamination
- Electrical noise
- Sensor instability
- Worn potentiometer tracks
- A loose joystick mechanism
- Poor soldering
- A damaged replacement module
- Software processing from another program
Calibration changes where the center is interpreted. It cannot make an unstable signal stable.
Jitter
Jitter is the small shaking visible in the axis reading while the stick is untouched.
A tiny change in the last decimal place may not affect gameplay. Larger movement or sudden jumps deserve more attention.
Watch the pattern rather than one number:
- Is it small and steady?
- Does it grow over time?
- Does it jump to a distant position?
- Does touching the controller make it worse?
- Does it change between USB and Bluetooth?
Movement Range
Range shows how far the stick reports movement in each direction.
A range problem may appear as:
- The stick stops short on one side
- The marker reaches the edge too early
- Upward movement differs from downward movement
- One stick covers less area than the other
- Diagonal movement is uneven
Range calibration may help after a joystick module has been replaced. It may not help if a physical gate, shaft, sensor, or circuit is damaged.
Circularity
Circularity shows how evenly the stick covers its outer movement.
Most physical sticks will not draw a mathematically perfect circle. A small amount of shape variation does not automatically mean the controller is faulty.
Look for major problems such as:
- A large flat side
- A missing direction
- Severe angular distortion
- Sudden spikes
- A shape that changes on every rotation
Circularity should be reviewed together with center offset, stability, and range. It should not be treated as the only controller-health score.
Trigger Range
Analog triggers may appear as button values from 0.0 when released to 1.0 when fully pressed, depending on the browser and controller mapping.
Check whether each trigger:
- Returns close to its resting value
- Begins responding smoothly
- Reaches full input
- Jumps during a slow press
- Behaves differently from the other trigger
Trigger testing is useful, but it is separate from analog-stick center calibration.
Suggested Deadzone
A deadzone is the small center area where input is ignored.
The suggested value should sit slightly above stable resting movement, not above occasional extreme spikes. A large spike may need repair rather than a huge deadzone.
Use the recommendation as a starting point. Games and controller tools may use different scales, response curves, and deadzone shapes.
Can You Calibrate a Gamepad Online?
You can test most browser-detected controllers online. Permanent online calibration is available only for specific controllers that a compatible browser tool can communicate with directly.
A normal browser tester reads controller state through the Gamepad API. The API exposes read-only properties for axes, buttons, connection details, and mapping. It is designed to read and respond to controller input, not to rewrite the calibration data of every connected device.
Some controller-specific utilities use WebHID to send supported commands to compatible hardware. These tools require exact device support and should not be treated as universal gamepad calibrators.
What Is the Difference Between a Gamepad Tester and a Calibration Tool?
| Tool type | What it does | Does it change the controller? |
|---|---|---|
| Gamepad tester | Reads buttons, sticks, triggers, and other exposed input | No |
| Drift tester | Measures movement while a stick is untouched | No |
| Deadzone calculator | Suggests how much center movement a game should ignore | No |
| Software calibration | Changes how an operating system or application interprets input | Sometimes |
| Hardware or firmware calibration | Saves supported center or range values to the controller | Yes, on supported devices |
| Controller repair | Cleans, aligns, resolders, or replaces physical parts | Yes |
Testing should come first. It gives you a result to compare after any change.
Does This Tester Permanently Change the Controller?
The standard browser test does not change the controller. It reads the input that the browser makes available.
Permanent changes require a separate supported calibration process. Do not confuse a moving on-screen marker with firmware-level calibration.
Which Calibration Method Should You Use?
| Test result | Better next step |
|---|---|
| Small, stable center offset | Try supported calibration |
| Constant minor movement near the center | Try a modest deadzone |
| Only one game has the problem | Check that game’s settings |
| Stick does not reach its full range | Try range calibration where supported |
| Input changes after opening Steam | Review Steam Input settings |
| Xbox stick changed after repair | Use the Xbox Accessories recalibration tool |
| Joy-Con or Switch Pro Controller feels wrong | Use Nintendo’s console calibration |
| DualSense or DualShock replacement module is off-center | Test first, then use a confirmed supported method |
| Reading jumps randomly | Inspect for a hardware fault |
| Calibration makes movement worse | Reset or restore the previous values |
| No fault appears in multiple tests | Avoid unnecessary calibration |
How to Calibrate a Controller on Windows
Windows includes a legacy Game Controllers panel that can be opened with joy.cpl.
Open the Windows Controller Panel
- Press
Windows + R. - Type
joy.cpl. - Press Enter.
- Select the controller.
- Open Properties.
- Use the Test tab to check its input.
Microsoft’s controller troubleshooting guidance uses joy.cpl to open Game Controllers and the Properties window to test the selected device. The exact tabs and options can vary by Windows version, driver, and controller.
Run the Calibration Wizard When Available
Open the Settings tab and select Calibrate if that option appears.
During the wizard:
- Leave the stick alone when asked for the center.
- Move it through its normal full range when instructed.
- Do not hold it at an angle during a center step.
- Complete every screen before testing again.
Why Is the Calibrate Button Missing?
Not every controller or driver exposes Windows’ older calibration wizard.
When the button is missing, use the method intended for the controller, such as:
- Xbox Accessories
- Steam Input
- Manufacturer software
- Nintendo system settings
- A supported PlayStation controller utility
Do not install random drivers simply to make the button appear.
How to Check Calibration Through Steam
Steam Input can sit between the physical controller and a game. It can translate, remap, or adjust input before the game receives it. Valve describes Steam Input as a configuration layer that receives controller data and passes translated input to the game.
Open Steam and go to its controller settings. The wording and location can change with client updates, but controller options are available from the Steam settings and from individual game controller layouts.
Check for Deadzone Settings
Steam supports controller calibration data and custom joystick deadzones.
Change the deadzone carefully:
- Start with the current value.
- Raise it in small steps.
- Test slow intentional movement.
- Stop when resting movement disappears.
- Avoid making the center feel unresponsive.
Check for Conflicting Input Layers
A controller may pass through several layers:
- Hardware calibration
- Windows interpretation
- Manufacturer software
- Steam Input
- Game controller settings
Two deadzones can stack together and make aiming feel slow. An anti-deadzone can also expose movement that a game would normally ignore. Valve notes that games may apply their own deadzones and that removing all deadzone can cause every small position to produce input.
Test one change at a time.
How to Calibrate an Xbox Controller
Xbox provides a thumbstick recalibration tool for supported Xbox Wireless Controllers through the Xbox Accessories app on console and Windows PC.
Xbox introduced this tool for minor thumbstick problems and for controllers affected by certain self-repairs. Xbox also states that not every thumbstick issue can be fixed through recalibration, including drift caused by normal wear.
Xbox Calibration Steps
- Connect the controller.
- Open Xbox Accessories.
- Select the correct controller.
- Check for a firmware update.
- Open the available thumbstick recalibration option.
- Follow the on-screen movements.
- Return to this tester.
- Compare the center and range with your baseline.
The exact options can depend on the controller model and current app version.
When Xbox Calibration May Help
It may help with:
- Minor inconsistent responses
- Calibration values affected by repair
- A replaced controller base or circuit board
- A repeatable center or range problem
It is less likely to help with:
- Mechanical looseness
- Severe random jumps
- Broken springs
- Worn internal parts
- Physical damage
How to Calibrate a PS5 DualSense or PS4 DualShock Controller
First, test the controller through USB.
PlayStation officially supports DualSense connections to compatible PCs through USB or Bluetooth and provides PlayStation Accessories for controller software updates on PC. Some controller features may vary by device and connection type.
Start With Official Troubleshooting
Before using a third-party calibration utility:
- Update the controller software.
- Test with a different USB data cable.
- Reset and reconnect the controller when appropriate.
- Test in more than one program.
- Compare USB and Bluetooth results.
Resetting a controller is not the same as recalibrating its analog-stick center.
What Is DualShock Calibration GUI?
DualShock Calibration GUI is an independent, open-source browser utility for supported DualShock 4, DualSense, DualSense Edge, and listed PlayStation VR2 controllers. It is not an official Sony or PlayStation service.
The current tool requires a browser with WebHID support, such as Chrome or Edge on a PC or Mac. Its interface includes stick-center calibration, stick-range calibration, temporary testing, permanent saving, restoration, and controller reboot options.
Safety Before Permanent Calibration
The utility warns users to:
- Keep the controller battery connected
- Make sure it is well charged
- Avoid disconnecting during calibration
- Test temporary calibration first
- Use permanent saving only after confirming the result
An interrupted write can carry more risk than a normal read-only gamepad test.
Can DualShock Calibration GUI Calibrate an Xbox Controller?
No. It is built for listed supported PlayStation controllers, not Xbox controllers.
An Xbox controller can still be checked with this gamepad tester, but it should use an Xbox-supported calibration method.
How to Calibrate Nintendo Switch Controllers
Nintendo Switch has built-in stick calibration for Joy-Con and supported controllers.
On the original Nintendo Switch family:
- Open System Settings.
- Select Controllers and Sensors.
- Select Calibrate Control Sticks.
- Tilt the stick you want to check.
- Review its response.
- Select calibration when needed.
- Follow the directions shown on screen.
Nintendo warns that incorrect calibration can make the stick respond strangely and provides an option to return to default settings. It also advises repair or support when a stick still fails after calibration.
Nintendo Switch 2 uses a similar route under System Settings, Controllers & Accessories, and Calibrate Control Sticks.
Run this browser test before and after using the console calibration so you can compare the center and movement range.
Can You Calibrate a Generic USB Gamepad?
Many generic and older PC controllers work with the Windows Game Controllers panel.
Whether calibration is available depends on:
- The device driver
- How the controller identifies itself
- Whether it uses DirectInput or another input method
- Manufacturer software
- The operating system
If Windows does not show a calibration option, check the manufacturer’s software or documentation. Do not flash firmware from a different controller model.
Calibration After Installing Hall Effect or TMR Sticks
A replacement joystick module can remove one fault and still need center or range adjustment.
After installation, check:
- Whether the stick rests near the center
- Whether it returns to the same point
- Whether all directions reach their expected range
- Whether the movement trace is stable
- Whether the module is physically aligned
- Whether the solder joints are secure
The supplied repair transcript described a Hall Effect installation that felt wrong in a game because the replacement stick was off-center. The repairer used a tester to view the axis position, then ran center and range calibration before checking the result again.
Do Hall Effect Sticks Need Calibration?
They may need calibration after installation.
A replacement module can still show:
- Center offset
- Poor physical alignment
- Uneven range
- Jitter
- Installation errors
- Incorrect stored values
Do not assume that a new module is centered just because it uses a different sensing technology.
Physically Align the Module First
Software should not be expected to hide a badly installed part.
Reopen the controller or return to the repairer when you see:
- A large persistent offset
- A stick that binds physically
- Uneven mechanical travel
- A crooked module
- Missing range in one direction
- Random output after soldering
- A fault that changes when pressure is applied to the board
Opening a controller can cause damage and may affect its warranty. Physical module adjustment and soldering should be left to someone with the right tools and experience.
Calibration vs Deadzone vs Reset vs Repair
| Method | What it changes | Best used for | What it cannot do |
|---|---|---|---|
| Browser test | Nothing | Finding and measuring the problem | Change controller values |
| Calibration | Center or movement interpretation | Stable offset or incorrect range | Repair unstable hardware |
| Deadzone | Ignores small center input | Minor stable movement in a game | Recenter the physical stick |
| Reset | Restarts or clears supported settings | Pairing or temporary software trouble | Repair worn parts |
| Cleaning | Removes accessible contamination | Dirt-related input problems | Restore damaged sensor material |
| Hardware repair | Replaces or adjusts parts | Physical wear or damage | Set every software layer correctly |
Can Calibration Fix Stick Drift?
Sometimes, but it depends on the movement pattern.
Calibration may help when the stick:
- Returns to the same off-center point
- Moves smoothly
- Has a stable signal
- Has incorrect center values after repair
- Has an incorrect outer range
Calibration is unlikely to provide a lasting fix when the stick:
- Jumps randomly
- Shakes heavily
- Feels loose
- Sticks mechanically
- Changes when the controller is tapped
- Has damaged internal parts
- Remains unstable after recalibration
Xbox’s own calibration guidance states that its recalibration tool cannot solve every problem, including drift caused by normal wear.
Is Deadzone Adjustment the Same as Calibration?
No.
Calibration changes how the controller’s center or range is interpreted.
A deadzone tells a game or input layer to ignore movement near the center.
A deadzone can hide small stable movement, but the controller is still reporting it. Using a very large deadzone may stop drift while also making fine aiming and slow movement harder.
How to Compare Results Before and After Calibration
Use the same test conditions for both runs.
| Measurement | Before | After | Result |
|---|---|---|---|
| Left-stick center offset | Improved / unchanged / worse | ||
| Right-stick center offset | Improved / unchanged / worse | ||
| Left-stick stability | Improved / unchanged / worse | ||
| Right-stick stability | Improved / unchanged / worse | ||
| Full range reached | Improved / unchanged / worse | ||
| Circular movement | Improved / unchanged / worse | ||
| Suggested deadzone | Lower / same / higher |
A successful calibration should produce a measurable improvement, not just a different number.
Check whether:
- The center moved closer to the middle
- The result became more stable
- The range became more even
- The stick returns consistently
- Fine movements still register
- The controller feels better inside the game
Why Does the Controller Feel Wrong After Calibration?
The Game Uses Its Own Deadzone
The browser shows exposed controller input. A game may add its own inner deadzone, outer deadzone, sensitivity, acceleration, or response curve.
Steam Input Is Changing the Signal
Steam Input can remap or translate physical input before the game receives it.
Test the game with the intended Steam Input profile and compare it with the raw browser reading.
Two Deadzones Are Stacking
A Windows, Steam, manufacturer, and game setting can all affect the final response.
A large deadzone at more than one layer can create slow or heavy-feeling movement.
Calibration Was Performed Incorrectly
Holding the stick off-center during the neutral step can save a bad center.
Moving through only part of the range can make the controller reach maximum input too early.
Reset or restore the previous calibration when the controller becomes worse.
The Hardware Is Still Faulty
Calibration cannot repair a broken spring, loose mechanism, damaged board, worn sensor, or poor solder joint.
Controller Not Detected
Press a Button
After connecting the controller, press a face button or move a stick while the page is active.
Try USB
Use a known data-capable cable. Some cables provide power but do not transfer data.
Check Windows or macOS
Confirm that the operating system detects the controller before troubleshooting the browser.
Close Other Controller Software
Temporarily close programs that may remap or capture controller input, such as:
- Steam
- DS4Windows
- Emulator input tools
- Controller mapping programs
- Manufacturer utilities
These programs do not always block browser detection, but closing them is a useful test.
Reload the Page
Connect the controller, reload the page, and press a button again.
Try Another Browser
Browser, operating system, controller, and connection support can vary. MDN notes that specific Gamepad API features may behave differently across platforms and controllers.
For controller-specific WebHID calibration, use a browser explicitly supported by that utility.
Supported Controllers and Calibration Options
| Controller | Browser input test | Main calibration route |
|---|---|---|
| PS5 DualSense | Usually available on supported systems | Official updates and troubleshooting; confirmed compatible specialist tools |
| PS4 DualShock 4 | Usually available when connected | Windows, supported software, or confirmed compatible specialist tools |
| Xbox Wireless Controller | Commonly supported | Xbox Accessories recalibration |
| Xbox Elite Series 2 | Commonly supported | Xbox Accessories and profile settings |
| Nintendo Switch Pro Controller | Environment-dependent | Nintendo console calibration or supported PC software |
| Joy-Con | Environment-dependent | Nintendo console calibration |
| Generic USB gamepad | Often supported | Windows joy.cpl or manufacturer software |
| Hall Effect or TMR replacement controller | Depends on its controller protocol | Device-specific post-install calibration |
“Supported” should always state what is supported. Input testing, vibration, software adjustment, and permanent calibration are separate features.
What This Test Can Confirm
The result can help show:
- Whether the browser detects the controller
- Whether buttons and axes are exposed
- Whether each stick rests near the center
- Whether the resting input is stable
- Whether the stick reaches its full range
- Whether left and right sticks behave differently
- Whether a calibration changed the browser reading
- Whether a deadzone may hide small stable movement
What This Test Cannot Confirm
The result alone cannot prove:
- Which internal component is damaged
- That a controller has been permanently repaired
- That every game will behave the same way
- That an unofficial firmware tool is safe for an unsupported model
- That a controller is genuine
- That the controller will work identically on a console
- That a small circularity error affects real gameplay
- That calibration will stop future hardware wear
How PadProTools Reviews Calibration Results
A useful calibration check should measure more than the largest drift value.
The review should include:
- A resting sample for both sticks
- Average X and Y position
- Distance from the center
- Maximum movement while untouched
- Movement variation over time
- Full directional range
- Return-to-center consistency
- Circular movement trace
- Left-versus-right comparison
- A before-and-after result
The final status should be based on the complete pattern. One decimal value should not be used to declare a controller perfect or broken.
Privacy and Controller Data
The browser exposes controller state to the page after the controller is connected and activated.
A gamepad test may read:
- Controller identification text
- Button states
- Axis positions
- Connection state
- Mapping information
- Available haptic features
Review the PadProTools privacy policy for details about analytics, saved reports, or any data sent by the website. Do not publish a “processed only on your device” claim unless the live implementation has been checked and confirmed.
FAQS
Is the gamepad calibration tester free?
The browser test can be used without buying calibration software. Some controller manufacturers or repair tools may use separate apps or hardware.
Do I need a Gamepad Tester download?
No download is needed for the browser input test. Permanent calibration may require Xbox Accessories, manufacturer software, console settings, or a supported controller-specific utility.
Is a gamepad tester the same as calibration software?
No. A tester reads the controller’s current input. Calibration software may change the center, range, deadzone, or stored controller values.
Can I calibrate a controller online?
You can test many controllers online. Permanent browser calibration is limited to specifically supported devices and compatible browser tools.
Does this tester change my controller?
The standard input test does not change it. It reads the button and axis data exposed by the browser.
Should analog-stick values be exactly zero?
Not always. Small readings may appear around the center. Stability and real gameplay behavior matter more than one exact zero reading.
What is a normal center offset?
There is no single number that fits every controller and game. A small, stable offset may cause no problem when the game has a suitable deadzone. Large or unstable movement needs more attention.
Can calibration remove stick drift?
It may correct a stable center error. It usually cannot repair random jumps, worn parts, mechanical looseness, or damaged sensors.
Can calibration make the controller worse?
Yes. A wrong center or incomplete range sample can make movement uneven. Save a baseline and use restore or reset options when available.
Should I use USB or Bluetooth?
Start with USB when possible. It removes wireless variables and may be required for controller-specific calibration. Test Bluetooth afterward if that is how you normally play.
Why is the Windows Calibrate button missing?
The option depends on the controller and its driver. Use manufacturer software or the controller’s supported platform method when Windows does not expose the wizard.
Can I calibrate an Xbox controller through a browser?
You can test it in the browser. Use the Xbox Accessories app for the official supported thumbstick recalibration process.
Can I calibrate a PS5 controller online?
Certain supported DualSense controllers can use independent WebHID calibration tools. Confirm the exact model and follow the tool’s safety instructions.
Is DualShock Calibration GUI official PlayStation software?
No. It is an independent open-source utility and states that it is not affiliated with Sony or PlayStation.
Can I calibrate a Nintendo Switch Pro Controller?
Yes. Nintendo provides control-stick calibration in the console’s system settings.
Do Hall Effect sticks need calibration?
They may need center and range calibration after installation. They can also show physical alignment or installation problems that software cannot correct.
Is deadzone adjustment a permanent fix?
No. It tells a game to ignore small input. It does not repair or recenter the physical joystick.
Why does the controller pass here but drift in one game?
That game may use its own deadzone, response curve, Steam Input profile, or controller mapping.
How often should I calibrate a controller?
Calibrate it when a test shows a repeatable center or range problem, after a relevant repair, or when the manufacturer instructs you to do so. Do not recalibrate a working controller on a fixed schedule without a reason.
When should I replace the joystick module?
Consider repair or replacement when the signal jumps randomly, remains unstable after calibration, loses range, feels mechanically loose, or fails in several different tests.
Test Before You Change Any Settings
Connect the controller, record its resting position, move both sticks through their full range, and save the result.
Calibrate only when the movement pattern shows that calibration is the right step. Then run the same test again and compare the numbers.
Start Gamepad Calibration Test